Cutting edge rounding
Cutting edge rounding is the round shape of a cutting edge for machining .
Manufacturing
There are different methods of rounding the cutting edges of a tool. This is done so that tool blades can be used longer and are sharp. There are various machine systems and methods for rounding the cutting edge of a tool. Since the cutting edges could break or even anneal, the cutting edge radii that are too thin would often be too sharp-edged and burred.
The rounding can be done using different methods:
- Sandblasting system or blasting systems that blast the workpiece with ceramic beads. Sandblasting systems are mostly used for a more elegant matt surface quality. These blasting systems only slightly round off.
- High-pressure water jet system which blasts with a pressure of up to 1200 bar, while the water acts in a rotating jet on the tool cutting edge and deburrs it.
- Corundum rounding machines which round the cutting edge precisely with abrasives, in order to produce workpieces according to any application requirements.
- Brushing or tumbling .
shape
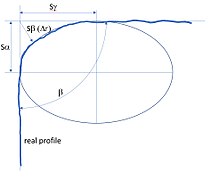
The shape of the cutting edge rounding can be symmetrical or asymmetrical. Symmetrical edges have a circular shape. Asymmetrical edges are elliptical. Asymmetrical shapes are also called waterfalls or trumpets.
application
The cutting edge rounding is used in cutting tools such as drills , milling cutters , indexable inserts to ensure the machining process. The following factors are relevant here:
- Tool life
- Quality of the machined surfaces
- Cutting speed
measuring technology
To ensure the quality of manufacture, tactile processes as well as focus variation are used. When quantifying the cutting edges, the following parameters are determined:
- Cutting edge radius (radii range from a few µm to several hundred µm). Alternatively, the ellipse (major and minor axis lengths) is also used for quantification in the case of asymmetrical edges .
- Clearance angle , wedge angle and rake angle . Since common measuring technology determines these angles in a cutting plane orthogonal to the cutting edge, the actual cutting angles can differ from the measured ones depending on the application.
- Symmetry K. This is the factor from Sγ and Sα. Alternatively, the ratio of the ellipse axes can also be used.
- Sβ (also known as the parameter Δr).
- Length and angle of the negative bevel or supporting bevel
The measurement of the cutting edge rounding requires a high lateral resolution from the measuring system and the ability to measure steep flanks. When measuring optically, it must be ensured that the numerical aperture of the objective does not represent a limitation in the measurement. This can be done by using an objective with a correspondingly high numerical aperture or by using a ring light illumination (increasing the illumination aperture ).
The measurement of the cutting edge parameters typically consists of the following steps:
- Acquisition of the profile. With tactile measurement technology, this is the acquisition of a single profile. With an optical measurement, a depth data set is measured and then many profiles are extracted in order to calculate an average profile.
- Adjustment of the desired edge shape (circle or ellipse). Because of the small radii, this step is numerically demanding. A more robust approach is to use a mathematical model consisting of a circle (or ellipse) and two tangential lines.
- Dimensioning of the fitted shape and calculation of the edge parameters.
literature
- Franz Tikal (Ed.): Cutting edge preparation. kassel university press GmbH, Kassel 2009, ISBN 978-3-89958-494-3 .
