Involute gearing
The involute toothing is one of several types of toothing for gears . It is the most important type of gear in mechanical engineering .
The involute shape results from a series of geometric requirements for the tooth flank geometry, the law of gearing :
The force exerted on each other should always run normal to the gear profile, tangential to the base circle diameters of both gears and through the pitch point C. The geometry that meets these requirements is the involute of a circle . The aim of the geometric requirements is to minimize mutual sliding and the associated wear and heat generation as well as an even transmission of torques and a constant transmission.
Basic concepts
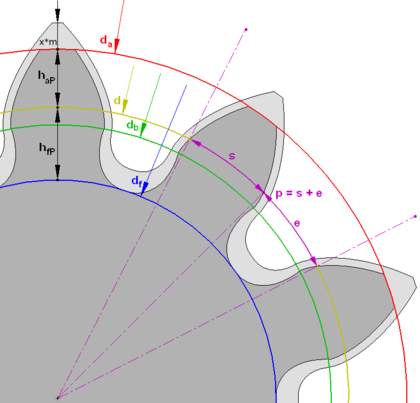
Designations
: Tip diameter
: Pitch diameter
: Base circle diameter
: Root diameter
: Head height
: Foot height
: Tooth thickness (on the pitch circle)
: Tooth gap (at the pitch circle)
: Division (on the pitch circle) with
: Number of teeth
: Profile shift factor (without unit)
: Profile shift (in mm)
In the sketch, the gear shown in light gray has a positive profile shift.
Reference profile
The reference profile corresponds to the theoretical rack profile on which the gear rolls without play. In practice, it is the shape of the tool with which the gear is produced using the hobbing process.
The reference profile of gears in use today is standardized in DIN 867.
module
The module (symbol m , unit mm) is the most important reference value for involute gears. All dimensions of the reference profile are given as factors of the module, which is indicated by an asterisk (*) in the variable name. For example, if the root height factor (h fP *) of the tooth is 1.2, a module of 2 mm results in a root height of 2.4 mm. The module indicates the size category of the gear, only gears with the same module can be paired with one another. If you only change the module of a gear and keep the other factors, you get a geometrically similar gear. From this it can be seen that the gear wheel diameter is also proportional to the module via the relationship:
Passing on
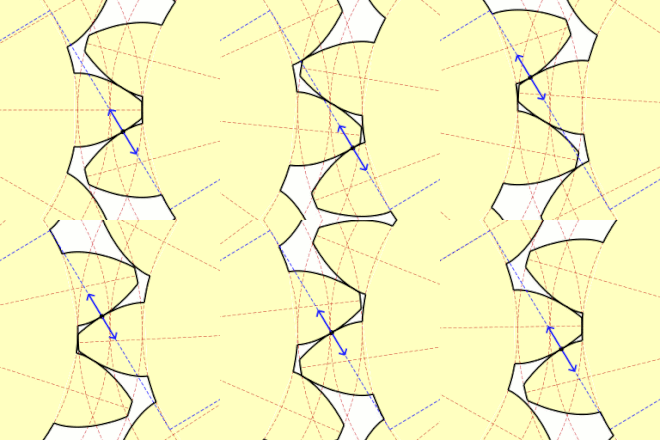
The point of contact between two tooth flanks moves on a straight line during the entire meshing, the meshing distance AE (see Figure 3). The angle by which the path of contact is inclined is called the pressure angle. This corresponds to the flank angle of the reference profile (only applies without profile shift). 20 ° are common here, although gears with a pressure angle of up to 5 ° (high gearing) are also available, especially in precision engineering. In vehicle transmissions, reference profiles with a profile angle of 17.5 ° are often used for reasons of noise (longer contact distance and thus greater profile overlap) . Larger pressure angles generally result in a higher tooth root and flank load-bearing capacity, but are only useful to a limited extent if the values are too large (> 30 °), because this significantly shortens the path of contact, which is generally disadvantageous in terms of smoothness.
While the point of contact moves along the meshing path, the sliding speed of the teeth varies with respect to one another. From the point of view of the driving gear, at the beginning of the meshing, sliding sliding prevails, which decreases towards the middle of the meshing path. In the so-called pitch point C (also the point of contact between the two pitch circles d w ), the sliding speed becomes zero. The pitch point C is not, as is often claimed, in the center of the line of contact, but is at the intersection between the line of contact and the center line of the gear axes. At this point there is pure slip-free rolling. In the second half of the path of contact, the sliding speed increases again in the pulling direction of movement. The signs of the speeds are correspondingly reversed for the driven gear.
Profile shift
A profile shift is understood to mean that the distance between the manufacturing tool and the gearwheel is increased or decreased. The profile shift factor usually has the symbol x and indicates the radial shift of the tool in relation to the normal module (see Figure 2), with external gears a positive value means a shift away from the gear center point and a negative value means a shift towards the center point.
advantages
Constant torque transmission
If the involute toothing is designed, manufactured and assembled correctly, there is always at least one pair of teeth in mesh. As a result, the involute toothing allows the uniform transmission of torques through a constant transmission . In order to increase the torques that can be transmitted and to improve the smoothness, attempts are made to involve as many pairs of teeth as possible in the torque transmission at the same time.
In the case of a toothing with a standardized 20 ° reference profile, however, a profile overlap of approx. 2.0 or higher cannot be achieved, as a result, with a straight toothing, either one tooth pair or two tooth pairs are in engagement alternately; the stiffness of the toothing fluctuates considerably, which can lead to torsional vibrations and noise.
In the case of helical gears, however, the total overlap is greater. This means that there are more pairs of teeth in mesh at the same time, which means that the fluctuation in the tooth rigidity is less.
Center distance tolerance
In contrast to other types of gearing, involute gearing is relatively insensitive to changes in the center distance between the two gears. As a result, the position tolerances of the bearing points, the concentricity of the shafts and their assembly are less critical with regard to the influence on the sliding speeds and the overlap of the toothing. Only the pressure angle and thus the overlap change.
Easy to manufacture and combine
The involute toothing is suitable for production using the hobbing process .
Since the reference profile has straight flanks, the hob cutters used to manufacture the toothing also have straight flanks and are therefore easy to manufacture. The reference profile of common gears is standardized in DIN 867.
literature
- Gustav Niemann , Hans Winter : Machine elements. Volume 2: General gears, gear gears - basics, spur gears. 2nd, completely revised edition, 2nd, corrected reprint. Springer, Berlin et al. 1989, ISBN 3-540-11149-2 .
Individual evidence
- ↑ tec-science: engagement of involute gears. In: tec-science. October 31, 2018, accessed on October 21, 2019 (German).


