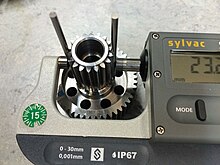
Roll measure
The roll dimension is a determinant of the tooth thickness in spur gears and is used in the design, manufacture and testing of spur gears and splined gears (also "splines" or "splined shaft gears").
One measures the roll size for internal gears between and external gears via two measuring rollers with a diameter lying in opposite tooth gaps. You can also determine single or three-roll dimensions, but this is not common in practice.
According to newer standards, e.g. B. DIN 5480 of 2006, one speaks of "measure over measuring circles". In DIN 3977 the diameters of the so-called "measuring pieces" are standardized. In addition, one speaks of the ball dimension when balls are used as measuring pieces instead of rollers.
application
With spur gears, adherence to the tooth thickness specified by the designer is crucial for the function of the gearing. However, the tooth thickness cannot be measured directly, which is why either the tooth width or the roll dimension is measured in production and quality assurance to check the tooth thickness.
The tooth width measurement with outside micrometers ("plate micrometers ") is easier to handle than the roller measurement and is usually preferred in practice.
However, there are cases in which the tooth width measurement is either not possible or only imprecisely possible. Here the measurement of the roll size is usually done.
- with very narrow helical gears (tooth width measurement is often not possible)
- with internal gears (tooth width measurement inaccurate)
- with splines (tooth width measurement often not possible, imprecise)
The measurement of the roll dimension is more sensitive than the tooth width measurement, since a change in the tooth thickness is included in the tooth width of about 1: 1, but the change in the roll dimension is approximately three times the change in tooth thickness.
The measuring piece diameter is calculated to match the toothing so that the measuring piece (only) rests on the tooth flanks. The measuring piece diameters to be used are usually tabulated in the standards for the splines. With splines, there are cases in which the measuring piece would rest in the tooth base and therefore not touch the tooth flanks. In such cases, measuring pieces that are flattened are used. This means that a surface is ground on the measuring piece.
Difference to the ball dimension
The roll dimension and the ball dimension are theoretically the same for straight gears.
When measuring with rollers, the measuring pieces are placed over the high points of the tooth flanks to be tested, while measuring balls also cover deeper points due to their point-like contact. Therefore, the roll dimension tends to be smaller than the ball dimension for internal gears and larger than the ball dimension for external gears.
Measuring balls are more sensitive to wear due to their point-like contact and therefore need to be checked and replaced more frequently.
Measuring rollers lie on two relatively long lines on the tooth flanks (line contact). They are therefore less sensitive to wear and tear.
With external helical gears, measuring rollers can only be used with an even number of teeth. If the number of teeth is odd, you can only measure the rolling dimension from the tooth center to the measuring roller or you have to use a measuring device that has sufficiently wide (plate-shaped) measuring surfaces. The wide measuring surfaces force the measuring rollers exactly into the opposite position.
Measuring rollers cannot be used with internal helical gears.
Measuring equipment
The following are used to measure the roll dimensions between two rolls (internal toothing):
- Inside micrometer rod
- Gauge block
- Two-point internal measuring devices ("Subito")
- special, spring-loaded measuring devices with inserted measuring balls
- Vernier caliper (can only be used as an alternative, as it is too imprecise!)
To measure the roll dimensions over two rolls (external toothing) are used:
- usual micrometers
- special, spring-loaded measuring devices with inserted measuring balls
calculation
The calculation of the roll dimension is only possible via one iteration . This means that you have to perform the same calculation several times in order to calculate an approximate value. Because to calculate the roll dimension, the angle must be calculated back from the involute function .
The angle to the given involute value can also be determined using approximation functions or tables.
It follows that you cannot simply calculate the roll size with a calculator. The easiest way to calculate the roll dimension is with a spreadsheet or with a short computer program.
Calculation of the measuring circle diameter to be used ("roller diameter")
- Normal module m
- Profile shift factor x
- Pressure angle α
Round up the calculated value. This formula only applies to small profile shifts.
Calculation of the dimension over / between two roles
| with an even number of teeth, with the diameter of the roller center circle | |
| with an odd number of teeth |
- Diameter of the roller center circle
- Base circle diameter of the involute
- to the appropriate profile angle
- , β helix angle on the pitch circle
, Tooth thickness on the pitch circle
Out
the angle is determined by iteration or tables , since the involute function cannot be calculated backwards.
Calculation example
Spur teeth
- Module m = 3.0 mm
- Number of teeth z = −43 (negative, because internal teeth)
- Pressure angle α = 20 °
- Profile shift factor x = +0.3 (without unit, positive profile shift with internal gearing goes inwards)
Selected roll diameter:
Tooth thickness on the pitch circle:
From iteration (e.g. using the target value search in a spreadsheet such as LibreOffice Calc):
In order to:
Finally:
(negative, because internal teeth)
literature
- Verzahntechnik Lorenz GmbH & Co. (Ed.): Gear tools. 3. Edition. Ettlingen 1977.
- Heinz Linke: Spur gear teeth . Carl Hanser Verlag, Munich 1996, ISBN 3-446-18785-5 .


