Accuracy class of a weighing system
The accuracy class of a weighing system denotes the maximum expected deviation of the measured value of a weighing system from the actual weight of the weighed object, insofar as the deviation is caused by the weighing system itself. Analogous to the accuracy classes defined for other measuring devices , scales should be divided into classes of devices that meet certain minimum technical requirements, in particular in order to comply with the calibration law .
Accuracy classes of non-automatic scales
The non-automatic scales include: B. vehicle scales or platform scales for which so-called manufacturer approvals can be carried out in accordance with Directive 90/384 / EEC . Thus are manufacturers that have a recognized quality management have system and are certified accordingly, to enable without Eichamt the scale for the business-like traffic release.
The accuracy of non-automatic scales is divided into accuracy classes I to IIII throughout Europe. The basis for this is the relative resolution, the quotient of the maximum load max and the smallest resolved weight value, the calibration value e (= d).
Source: EN 45501 Metrological aspects of non-automatic weighing instruments
Class III is the most important in the industrial environment. Class IIII coarse scales, on the other hand, are only used for weighing inexpensive goods such as B. sand and gravel permitted. Higher value goods, such as grain , are only weighed using commercial scales in a way that is relevant for accounting. Often, entire trucks are weighed on vehicle scales . As an example of the accuracy of commercial scales, the calibration error curve of a commercially available vehicle scale is shown below, whereby the permitted traffic error may be up to twice the value of the new calibration error.
Accuracy classes of automatic scales
In the field of automatic scales, in the z. B. bulk or catch scales as well as calibratable belt scales are covered, the MID directive MID 2004/22 / EG applies.
Here, too, manufacturers can get certified in order to issue so-called declarations of conformity for placing weighing systems on the market. For the operator, this procedure can be equated with manufacturer verification and saves the use of verification officers. The regular recalibrations after three or two years are still the responsibility of the calibration authorities of the federal states.
The accuracy classes for automatic scales are defined in accordance with Annex MI-006 of Directive 2004/22 / EC. For automatic bulk scales, which are often used for receiving and loading weighing in silos, there is a classification according to percentage error limits.
Source: Directive 2004/22 / EC; Official Journal of the European Union
The accuracy class 0.5 is preferred for weighing when accepting and loading free-flowing bulk materials. With a loading of 20 t, for example, an error of max. ± 0.25% to tolerances of ± 50 kg. In practice, however, the accuracy of the weighing systems mentioned so far is mostly below the maximum re-calibration error limit, so that this re-calibration error is accepted as the maximum deviation to be tolerated in business transactions. With other weighing systems, such as B. calibratable belt scales, which can be calibrated, but are subject to a higher accuracy class, the tolerances are significantly higher. The official traffic error limits are adhered to here as well, but they are often not accepted in business transactions. Thus, the lower-priced weighing systems are often ruled out due to the excessively high tolerances in the trade with high-quality goods.
Weighing systems in practice
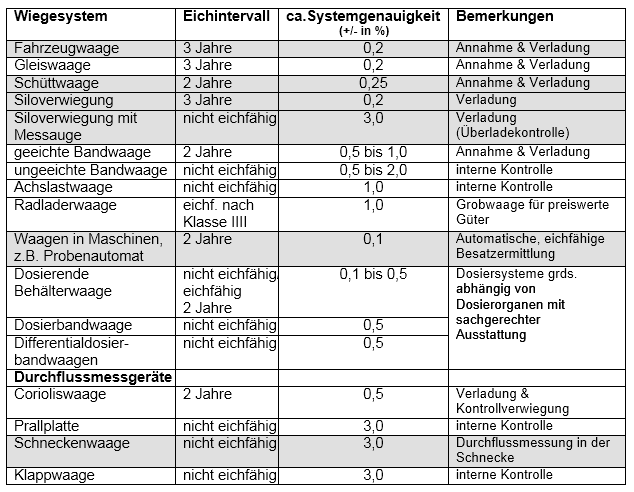
In practical use of weighing systems, the accuracy actually achieved often depends on the local conditions, since these external factors can vary considerably. However, there are practical empirical values about the system accuracy of various weighing systems. The following table provides an overview of the practical system accuracy of different scales including the prescribed calibration intervals.
Individual evidence
- ↑ Non- automatic scales ( page can no longer be called up , search in web archives ) Info: The link was automatically marked as defective. Please check the link according to the instructions and then remove this notice. (PDF; 198 kB)
- ↑ EN 45501 Metrological aspects of non-automatic weighing instruments, October 1992
- ↑ MID Directive MID 2004/22 / eg, Official Journal of the European Union (PDF)
- ↑ Appendix MI-006 Directive MID 2004/22 / eg (PDF)
- ↑ Council Directive 90/384 / EEC (PDF)
- ↑ MID Directive MID 2004/22 / eg, Official Journal of the European Union (PDF)
- ↑ Ulrike Bitzer: Accuracy of industrial weighing systems. In: Mühle + Mischfutter No. 18, 2009


