Intersection (Descriptive Geometry)
Intersections occur in the descriptive geometry as common points
- of curves (straight lines, circles, ...) in the drawing plane ( floor plan, elevation table , ...).
- of straight lines in the visual space.
- of straight lines with planes , spheres , cones , cylinders , ... (in the viewing area).
When straight lines are involved, which is usually the case, the intersection points are called intersection points .
Common points of curves and surfaces are not calculated in the descriptive geometry , but rather determined graphically in a two-panel projection (floor plan and elevation) and then, if necessary, transferred to a clearer projection (axonometry).
Intersection points (intersection points ) and intersection curves ( penetration curves ) are usually dealt with in a common chapter on penetrations in books on descriptive geometry .
Intersection of two straight lines in space
Two straight lines in space given in ground plan and elevation then have one
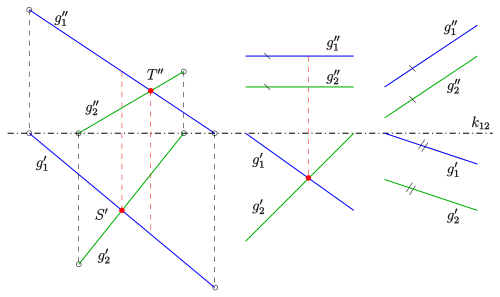
- Point of intersection , if their ground plan and elevation intersect in a suitable two-panel projection and the points of intersection lie on the same folder (perpendicular to the edge of the crack) (see picture).
Two lines are crooked , if
- the plan line and the elevation line intersect and their intersection points lie on two different folders or
- the elevation lines are different and parallel and the plan lines intersect or
- the plan lines are different and parallel and the elevation lines intersect.
Visibility considerations:
When looking at visibility (see straight line and triangle, below) it is important to decide for two crooked straight lines which straight line runs above or in front of the other. Therefore, we consider the intersection of the floor plans and then recognizes the to its folders in elevation, which runs precisely at this point about the other (see image skew lines, running on the site over ). You proceed in the same way to decide which straight line runs in front of the other.
If both the elevations and the floor plans of the straight lines are parallel, the straight lines themselves are parallel .
Comment:
- If the two straight lines lie in a plane that is perpendicular to the floor plan but not to the elevation table, the floor plans of the straight lines coincide. This is not a problem, however, since the intersection point can be constructed in the elevation and then transferred to the floor plan. The same applies if the plane is only perpendicular to the auris table.
- If the two straight lines lie in a plane perpendicular to the edge of the crack , their ground plans and elevations coincide. In this case, the description of the straight line through the floor plan and elevation is not clear and you cannot determine an intersection point. The point of intersection can only be determined by adding a third crack (three-panel projection).
Intersection of a straight line with a plane
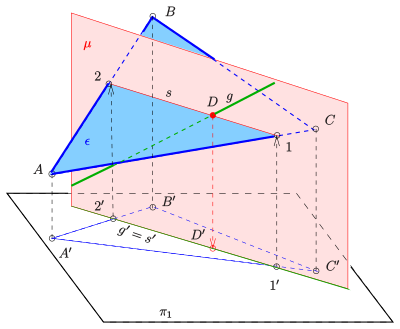
Given: a plane through a triangle and a straight line in plan and outline. Wanted: the point of intersection (intersection) of the straight line with the plane.
The vertical auxiliary plane containing the straight line is used for construction. The floor plans and therefore coincide (see picture). The plan of the intersection line also coincides with . The points of intersection of with the triangle are thus the outlines of the points of intersection of the straight line with the triangle. The elevations can be found in folders. Thus it is known and can be cut with. is the outline of the penetration point sought . The floor plan is on the associated folder and .
If it seems suitable, the auxiliary plane can also be selected perpendicular to the elevation table. Then the construction begins in elevation.
Regarding visibility : At this point you can see that the straight line runs over the side of the triangle . The straight line is visible in the plan between the points and and hidden between and by the triangle (as an area).
Intersections of a straight line with a cylinder
Determining the points of intersection of a straight line with a vertical circular cylinder that is perpendicular to the floor plan is particularly easy: The floor plans of the points of intersection are obtained as points of intersection of the floor plan of the straight line with the floor plan of the cylinder (circle) and the points of intersection are transferred to the Right now in elevation (see picture).
If the cylinder is not perpendicular to the ground or elevation board, insert a new crack board so that this is the case in the new assigned cracks (see intersection of straight lines and spheres).
Intersections of a straight line with a sphere
Given: ground plan and elevation of a sphere and a straight line . Wanted: the intersection of the straight line with the sphere.
The vertical plane through the straight line is selected as the auxiliary plane . cuts the sphere in a circle . The intersection of the straight line with the circle provides the intersection points sought .
Execution of the construction:
The plan of the auxiliary level coincides with the plan of the straight line . In order to be able to determine the intersection points , a new crack plane is introduced so that it is parallel to the plane , i.e. H. the new crack edge must be too parallel. After choosing a crack edge , you construct the new cracks of the sphere, the circle and the straight line (see two- panel projection ). The intersections of the straight line with the circle initially provide the cracks of the points sought . You can find and then via the associated folder .
Intersections of a straight line with a cone
Given: ground plan and elevation of a cone and a straight line . Wanted: the intersection of the straight line with the cone.
In this case, one does not use a vertical auxiliary plane, but the inclined plane through the apex and the straight line . intersects the cone in two surface lines (straight lines) . The intersection of and with the straight line provides the intersection points sought.
Execution of the construction:
- To determine the ground plan track of the level , two track points are required. The first point in the example (see picture) was the layout track of the straight line . A second track point is obtained with the help of an auxiliary straight line lying in the plane .
- The intersection of the ground plan track with the bottom circle of the cone provides points that lie both on the cone and in the plane . The straight lines are the surface lines and their intersections with the intersection points (penetration points) sought . In the example, you first get the floor plans and as intersections of the associated folder with the elevations .
Web links
- Descriptive geometry for architects (PDF; 1.5 MB). Script (Uni Darmstadt), pp. 35, 73, 74.
literature
- Rudolf Fucke, Konrad Kirch, Heinz Nickel: Descriptive Geometry. Fachbuch-Verlag, Leipzig 1998, ISBN 3-446-00778-4 , pp. 34,86,87.
- Ulrich Graf, Martin Barner: Descriptive Geometry. Quelle & Meyer, Heidelberg 1961, ISBN 3-494-00488-9 , pp. 70, 230.
- C. Leopold: Geometric Basics of Architectural Representation. Verlag W. Kohlhammer, Stuttgart 2005, ISBN 3-17-018489-X , p. 92


