
Visualizer
A document camera or visualizer is a video camera for recording a document or object illuminated by a light source in a presentation . It can record any type of template (books, photos, three-dimensional objects, etc.) quickly and easily and provides a high-resolution image for projectors , interactive whiteboards or video conference systems. This flexible presentation device can be viewed as a further development of the episcope or the overhead projector .
General functionality and use
The visualizer converts the image of the original into an analog or digital video signal, which is then fed to a separate video projector or monitor. The camera can either be mounted in front of the deflecting mirror instead of the projection lens or on a supporting arm. There are other designs that can be hung directly from the ceiling. The template is either placed on a glass plate and illuminated from below or placed under the camera and illuminated by side lamps. Outwardly, the visualizer then resembles a flatbed scanner or a repro stand from photography, depending on where the camera is mounted.
The majority of a visualizer is usually attached to an arm and is used in conjunction with projectors in classrooms or for presentations. Visualizers are very often used as a replacement for overhead projectors . Some visualizers can also be used in conjunction with a microscope.
Visualizers are actually more related to scanners than projectors , as they do not have a facility for active projection and have to be connected to an optical playback device.
Historical
The first visualizers were developed to meet the increased demands on the projection and presentation of original documents, plans, drawings and objects, instead of being forced to copy these objects onto a slide in order to integrate them into a presentation using an overhead projector to be able to.
As projectors and computers became more widespread in meeting rooms, the demand for replacing the overhead projector also developed in order to give the lecturers additional options apart from the usual presentation programs . In the early days, this was very often a simple way of spontaneously integrating the existing overhead transparencies or individual slides into the presentations without having to install additional devices. In addition, the lecturer had additional options and could, for example, visualize a book spontaneously and directly.
The first attempts at walking and prototypes were mostly simple video cameras that were mounted on a copy stand (from professional photography) and additionally equipped with lights to ensure independence from the ambient conditions (especially in darkened rooms, so the visibility of the projected image and the contrast the tube projectors was guaranteed). The prevailing video technology of the cameras at the time was a decisive factor that determined the resolution of the system.
Visualizers have often benefited from developments in other industries, some of which also enabled quantum leaps in the field of visualizer technology. A good example here is the camera technology used. After the original models very often had simple black and white cameras, the use of color cameras was a real milestone in terms of presentation quality.
Video camera technology, which had dominated for a long time, was supplemented for the first time at the end of the 1990s by progressive scan cameras (PS cameras). Compared to the interlaced process of a video camera (reading out half frames), a PS camera always reads out the full image, which is clearly noticeable in the camera resolution. Originally, however , compromises had to be made in terms of the frame rate (frame rate, i.e. how many images are displayed per second), as neither image sensors nor the motherboard used were able to process the increased volume of data.
Nowadays, PS cameras have largely displaced video cameras from the market and the original difficulties in using PS technology have been virtually eliminated. Many visualizers available on the market can output at least 20 fps (frames per second), high-end models are able to display 30 fps in various resolutions and aspect ratios without any problems.
technology
The design and specifications of a visualizer result from the mix and application of different technologies. For the quality of the recorded image, these are primarily the assemblies optics, camera, a light system and a main board with the associated firmware (software). The whole thing is implemented by the individual manufacturers using a wide variety of mechanical constructions.
optics
Optics are one of the most critical components when it comes to image quality. Depending on the price range of the devices, simple lens systems up to highly complex optical systems are used, which differ significantly in quality and size. Another important component is the optics, the iris or the diaphragm. The iris controls and regulates the incidence of light through the lens onto the image sensor.
If an object is to be imaged on the image sensor, there is exactly one point at which a lens is focused. However, there is an area in front of and behind the object that is sharp enough for the human eye, the so-called depth of field . It depends on a few factors, but mainly on the aperture (iris or iris diaphragm ). The smaller the aperture, the greater the depth of field (and vice versa).
camera
The progressive scan cameras in use today rely either on CCD sensors or CMOS sensors . The general advantage compared to video cameras is the significantly higher resolution, since in contrast to the interlaced process (line skip process) with a PS camera, the full image is read out and not just half images are superimposed with a time offset.
In principle, image sensors can only deliver monochrome images. With a 1-chip camera, this color information can be obtained through the use of color filters over each pixel. The so-called Bayer filter is very common in 1-chip cameras , where red, green and blue filters are arranged according to a specific pattern. The number of green pixels is twice as large as those of the blue and red, which simulates the higher sensitivity and resolution of the human eye to green light. In order to get a color image, a wide variety of algorithms are used to interpolate the missing color information. However, a lower resolution of the camera has to be accepted.
Another possibility for generating color images is to use a prism that splits the white light into its red, green and blue components and directs it to the sensor of the respective color. This complex camera technology is used in 3-chip cameras and enables very good color reproduction at very high resolutions.
Modern camera systems that are used in visualizers are able to deliver high-resolution color images with 30 images per second. With a 3-chip camera, the measured resolution can be up to 1500 lines. In addition, the page formats commonly used today of 4: 3, 16: 9 and 16:10 can easily be adapted or set to the existing display.
lighting
Lighting is an essential part of a visualizer. To ensure good color rendering, the lighting system used must illuminate the recording area as homogeneously as possible. The higher the illuminance, the more independent one becomes from the ambient light. In addition, a small aperture can be sufficient with powerful lighting systems and this in turn has a significant influence on the depth of field of the visualizer (the smaller the aperture, the greater the depth of field). The better the lighting, the more light will also hit the camera sensor and the less disturbing image noise will be noticeable.
Various visualizer models integrate additional functionality into the lighting, such as a synchronized light field that clearly shows the operator at any time which detail is currently being shown to the audience.
Motherboard and firmware
Modern camera systems represent a major challenge for the motherboard. Ever larger resolutions and high frame rates generate large amounts of data that have to be processed in real time. The main board and the image processing running on it have a major influence on the final image quality.
Good visualizers have a multitude of ingenious automatic systems on board that make life as easy as possible for the user. A permanent autofocus automatically detects changes to the template, for example, and adjusts the focus settings in fractions of a second, without the need for the lecturer to do anything. Other important automatic functions are, for example, the auto iris, the auto exposure, the auto hit balance and the automatic gain control.
As mentioned before, visualizers need an image display device to show the information to the audience. Modern motherboards have a variety of connections to ensure application flexibility. In addition to HDMI, DVI, VGA and video connections for connecting to displays (projectors, monitors and video conference systems ), there are also various computer interfaces to be able to connect to the computer, the interactive whiteboard or room control systems. These are mainly USB, network (LAN) and serial interfaces.
In addition, external PCs or laptops can be connected to the visualizer to easily switch between a Powerpoint presentation or a live demonstration. Different models can also handle external storage media and play files directly from the USB stick or save snapshots on it during the presentation.
Some visualizers allow their firmware to be updated and can thus be equipped with new functions.
Designs
There are several types of visualizers, generally they can be divided into two groups. Some are table models in various forms and the other group are the so-called ceiling visualizers.
Table models (Desktop Visualizer)
Table models are classic visualizers that allow you to work similarly to an overhead projector. Switching is easy and many users appreciate the additional flexibility with regard to the objects that can be used, without having to accept major technical hurdles. The devices can also be used on a mobile basis, i.e. a device can be used in different rooms if required without the need for a large installation effort.

Visualizer with flexible arm ( gooseneck ) from Lumens
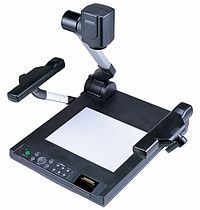
Samsung visualizer
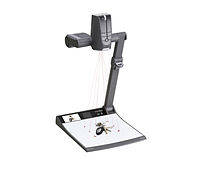
WolfVision VZ-9.4 Desktop Visualizer

VIS-360 from SG


Ceiling models (Ceiling Visualizer)
Ceiling models are a further development of the table models and give the user some additional degrees of freedom. For example, the objects that are visualized can be much larger. Ceiling visualizers allow completely natural working, because the normal conference table is converted into a work surface at the touch of a button. The lecturer's view of the audience and vice versa is not blocked by a technical aid, but the technology that is supposed to support it does it inconspicuously in the background. This aspect is particularly important in telepresence systems (high-end video conferencing), as here the illusion is to be created that the interlocutors are sitting at the same table in the same room.
Ceiling models can also be completely sunk into the ceiling if the focus is on the design of the room.
Applications
In theory, everything can be displayed with a visualizer. Most objects are simply placed under the camera, the camera records the image and displays this live image using a projector, for example. Different designs of visualizers allow great flexibility with regard to the placement of objects. For example, larger objects can simply be placed in front of it and the camera and visualizer are simply rotated. Or the visualizer can be mounted directly on the ceiling and allows completely natural working without the technology being even noticed.
Typical applications for Visualizer are: training courses, meetings, conferences, seminars, product presentations, presentations of evidence in courtrooms, various medical applications (telemedicine, telepathology, X-ray images, etc.), video conferences and telepresence (using the Visualizer as a document camera).
Web links
- The Visualizer - A White Paper. (PDF; 1.6 MB) WolfVision (Austria), archived from the original on October 12, 2014 ; accessed on October 12, 2014 (English).