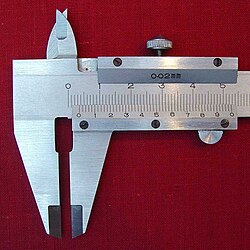
Vernier

The vernier is a movable length scale to increase the reading accuracy on measuring devices for lengths or angles , for example on a caliper , a height gauge or a ruler for mapping. A vernier is also common on the drawing head of a drawing board, which is used to precisely measure angles at this point. Occasionally barometers are also equipped with a vernier scale.
Invention and naming
The vernier scale was introduced in 1631 by the French mathematician Pierre Vernier (1580–1637), after whom it is also named in many countries (for example English vernier scale or vernier , French le vernier ).
The name Nonius, which is common in German-speaking and other countries, goes back to the Latinized name Petrus Nonius of the Portuguese astronomer , mathematician and geographer Pedro Nunes (1502–1578). Nunes had invented a complicated device for more precise reading of angles, from which, after several further developments, the simpler Vernier model emerged.
method
principle
It is difficult for the human eye to determine a slight offset. Without a vernier, it would therefore not be possible with certainty to read distances that are smaller than the finest subdivision on the main scale (e.g. the millimeter division on the centimeter ruler , see graduation marks ).
However, it is much easier to determine when two tick marks are opposite each other with sufficient accuracy. You can do this with the vernier. During the measuring process, this slides as a movable reading scale over the fixed main scale (the rule ) and enables partial distances to be measured with an accuracy of more than a tenth of a millimeter (0.1 mm).
Theoretically, only the limited resolution of the human eye of 0.05 mm sets a limit for precise determination. With fine lines, a reliable reading of at least 0.1 mm is achieved. Additional aids to support the eye, such as a reading magnifier, enable even smaller distances to be recognized (e.g. 0.02 mm).
The measurement inaccuracy is noted next to the scale (e.g. 1/20 mm), and the reading error is of the same order of magnitude.
example
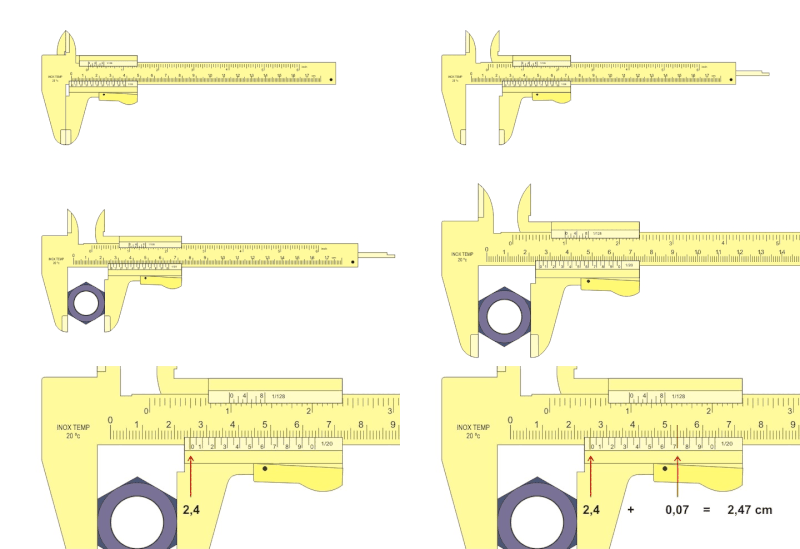
Fig. 2 shows an enlargement of the vernier caliper of Fig. 1. The reading is 3.58 mm. The 3 mm are read on the upper scale, the 0.58 mm on the lower (see red markings). The measurement error , however, is approx. 0.04 mm. Because the reading accuracy of the vernier of 0.02 mm comes with a reading error of the same order of magnitude. In the example it is therefore not clear whether the true value is 3.58 or 3.60.
calculation
The vernier itself is shortened to compared to a unit of length ( ) on the rule. The vernier scale usually has ten graduation marks, so each of these parts is long. With each part on the vernier, exactly one hundredth is missing from the next tenth on the scale.
Stated differently: .
Therefore, a mark on the vernier can only be exactly opposite a mark on the ruler if the reading mark, i.e. i. the zero mark of the vernier has been shifted by the corresponding difference amount. If the reading mark is, for example, behind a tenth mark, only the third mark of the vernier will coincide with a graduation of the scale. The distance from the reading mark to the mark on the vernier is long. Because it is:
More scales
In order to increase the reading accuracy, the vernier scale can also be stretched to or etc.
Here it is possible to divide it into twenty or forty parts. The individual tick marks are then separated by or . The area in which precise measurements can now be made increases to forty graduation marks .
The fact that there is always exactly one line on the vernier which is opposite a graduation of the main scale - provided that the measurement accuracy is within the limits - is related to the following property of the series of nines, which the vernier makes use of: The difference between a subsequent member of the series of nine and the next higher The tens runs through all numbers from zero to nine in a cyclical and ascending order.
In principle, it is therefore possible to construct vernier scales based on a row of ones, three or seven.
Comparator principle
A more precise measurement would also be possible if the Abbe comparator principle is fulfilled: the test piece and test device (or its scale) must be on one axis. In addition, the reading of the measured value must be perpendicular to the measuring scale in order to avoid parallax errors in the reading.
In the best-known application of the vernier, the vernier caliper , the Abbe comparator principle is not fulfilled. Nevertheless, due to its simplicity, it is still the cheapest and most widely used measuring device for mechanics and technicians.
Further developments for higher accuracies
In the past, the vernier was often used, e.g. B. also with theodolites . Glass scales and measuring microscopes with micrometers have been used on these since around 1930 , which increases the accuracy to at least 1% of the scale marks. The reading became even more precise thanks to the double circle principle (two concentric scales).
Newer total stations , like (very inexpensive) calipers, usually have optoelectronic reading devices (with about 5 to 10 times better accuracy than the simple vernier).
See also
- Nonius connector (application of the vernier principle to components)
Individual evidence
- ↑ Cf. Duden online: Nonius under "Origin" (there, however, P. Nunes' life data is not correctly given)


