Battle of Spy Kop
| date | January 23 to 24, 1900 |
|---|---|
| place | Spy Kop, 38 km southwest of Ladysmith , South Africa |
| output | Victory of the Boers |
| Parties to the conflict | |
|---|---|
| Commander | |
| Troop strength | |
| 11,000 infantry 2,200 cavalry 36 field cannons |
6,000 |
| losses | |
|
383 killed |
58 killed |
Talana Hill - ElandslaAGEN - Modder River - Stormberg - Magersfontein - Colenso - Spion Kop - Paardeberg - Ladysmith - Sanna's Post - Mafeking
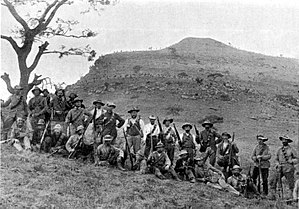
The Battle of Spion Kop was a battle between the British and the Boers in the Second Boer War . It took place on 23/24. January 1900 at the Spion Kop ( Afrikaans Spioenkop ), a mountain cone 38 kilometers southwest of Ladysmith , and ended with the victory of the Boers.
prehistory
At the beginning of 1900, a good month after the Colenso disaster , General Sir Redvers Buller VC, as Commander in Chief of the British troops in Natal, made another attempt to relieve the beleaguered Ladysmith. He sent General Charles Warren with 11,000 infantry, 2,200 cavalry and 36 field guns.
Warren's orders were to cross the Tugela River at Trickardt's Drift and attack the Boer-occupied Tabanyama Ridge . This mountain formation, to which the spy Kop belonged, dominated the road to Ladysmith.
The summit plateau of the Spion Kop was initially only weakly defended, as the Boers did not expect an attack over its steep slopes. The Boers had set up their main defense position - contrary to what the British expected - on the northern slope facing away from the British. This tactic allowed the Boers to watch British movements while remaining invisible to the enemy themselves. Warren also delayed the attack for a disproportionately long time. He reached Trickardt's Drift on January 17th, but did not attack until the 23rd, giving the Boers six days to reinforce and consolidate their defensive positions.
The battle
On the night of January 23rd, Warren sent a detachment under Gen. Edward Woodgate out to secure the Kop spy. The department was headed by Lt. Col. Alexander Thorneycroft .
The British climbed the mountain cone in darkness and thick fog. The weak Boer forces who occupied the summit plateau were surprised and driven away. A few British pioneers tried to dig trenches in the stony ground while nearly 1,000 soldiers stood idle. Woodgate, meanwhile, reported to Warren that he had taken the summit.
However, when the fog cleared at dawn, the British, who previously had no knowledge of the topography of the summit , noticed that they had only occupied the smaller and lower part of the plateau, while the Boers were still occupying higher positions, the the British enclosed on three sides. This resulted in an extremely poor defensive position for the British, who could hardly see anything from their only 40 cm deep trenches, while the Boers had a full view of the trenches and were able to sweep them over their full length.
But the Boers' situation was also critical. If the British were able to occupy the neighboring, previously unoccupied hills of Conical Hill and Aloe Knoll, British artillery could fire at the Boer key positions on Tabanyama Ridge from there. There was also the risk that the British would conquer the Twin Peaks east of the Spion Kop, from which they would have been able to encompass the entire left flank of the Boers. In order to avert this danger, the Boer leadership decided to recapture the spy Kop as quickly as possible.
Burian artillery began bombarding the British from the neighboring Tabanyama Plateau. Meanwhile, Commandant Henrik Prinsloo tried to occupy Conical Hill and Aloe Knoll with 88 men. 300 Boers, most of them from the Pretoria Commando, attacked the British positions on the Spion Kop head-on, but were repulsed bloodily.
There was now a stalemate on the head . The Boers could not drive the British from the summit plateau, but now held fire positions on the higher Aloe Knoll and kept the British under artillery fire. The British failed to build on their initial success and the initiative now passed to the Boers.
With exhaustion, heat and thirst, morale began to decline on both sides. The Boers on the Kop saw on the plain below a great number of soldiers who refused to take part in the battle. The resulting sense of betrayal, the inherent lack of discipline in the Boer civil army, the seemingly secure British positions and the unsuccessful frontal attack were too much for some Boers, and some began to withdraw from their hard-won positions.
On the other hand, the shelling began to take its toll on the British. Woodgate was fatally wounded and three commanding officers died in quick succession. Officers and men from different units were confused and the British were leaderless, confused and worn down by the constant fire.
Warren had meanwhile dispatched two more battalions and the Imperial Light Infantry to reinforce them. However, he refused to attack Tabanyama and forbade the bombardment of the Aloe Knoll, which he believed was occupied by the British. Thornycroft was meanwhile the commanding officer on the head.
On the Kop already tried parts of the Lancashire Fusiliers to surrender to the Boers. However, Thornycroft was able to prevent this. At this point, British reinforcements arrived, who managed to occupy the Twin Peaks and thus stabilize the British positions.
The loss of the Twin Peaks demoralized the Boers completely and after dark they withdrew from the Kop spy unnoticed by the British. The battle was now as good as won for the British. Though Thorneycroft couldn't have known that. Unaware of the situation and worn down by the 16-hour fight, heat and lack of water, he also ordered the withdrawal, as the British were still threatened with running out of ammunition. The lost victory is mainly to blame for the extremely hesitant Warren.
In the morning the Boer generals were astonished to see two Boers on the summit of the Spion Kop, waving their hats in triumphant gestures.
After the battle
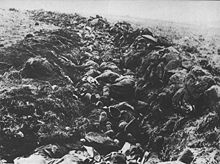
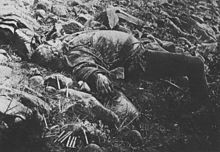
Many of the British dead were buried in the trenches.
The British withdrew across the Tugela, but the Boers were too weak to pursue them.
Ladysmith wasn't horrified until February 28th.
British troops involved
Cavalry (MajGen The Earl of Dundonald )
- 1st Royal Dragoons
- 13th Hussars
- Bethune's Mounted Infantry
- Thorneycroft's Mounted Infantry
- Natal Carabineers
- South African Light Horse
- Imperial Light Horse
- Imperial Light Infantry
- Natal Police
2nd Division (LtGen Sir Francis Clery )
- 2nd Brigade (MajGen Henry Hildyard )
- 2nd East Surreys
- 2nd West Yorks
- 2nd Devons
- 2nd Queen's West Surreys
- 4th Brigade (MajGen Neville Lyttelton )
- 1st Rifle Brigade
- 1st Durham Light Infantry
- 3rd King's Royal Rifles
- 2nd Scottish Rifles, emerged from the 90th Light Infantry
- A squadron of the 14th Hussars
- 7th, 14th and 66th Batteries Royal Field Artillery
3rd division
- 5th Irish Brigade (MajGen Fitzroy Hart )
- 1st Inniskilling Fusiliers
- 1st Connaught Rangers
- 1st Royal Dublin Fusiliers
- 1st Border Regiment
- 6th Fusilier Brigade (MajGen Geoffry Barton )
- 2nd Royal Fusiliers
- 2nd Royal Scots Fusiliers
- 1st Royal Welch Fusiliers
- 2nd Royal Irish Fusiliers
- A squadron of the 14th Hussars
- 63rd, 64th and 73rd Batteries Royal Field Artillery
5th Division (General Charles Warren )
- 10th Brigade (MajGen Talbot Coke )
- 2nd Dorset Regiment
- 2nd Middlesex Regiment
- 11th Brigade (MajGen Edward Woodgate )
- 2nd King's Royal Lancaster Regiment
- 2nd Lancashire Fusiliers
- 1st South Lancashire Regiment
- 1st York and Lancashire Regiment
- 19th, 20th and 28th Batteries Royal Field Artillery
Other troops involved
- 2nd Royal Dublin Fusiliers
- 2nd Somerset Light Infantry
- 61st Battery which was equipped with howitzers
- Natal Battery with 9 pounders
- Battery of six Royal Navy 12 pounders
- 4th Mountain Battery
- 4.7 inch Royal Navy guns
Others
- Mahatma Gandhi was involved in the battle as a British medic.
- Winston Churchill was involved as a courier between the Kop spy and Buller's headquarters .
Commemoration
- In some English football stadiums grandstands are named after the Spion Kop, about the Anfield stadium ( FC Liverpool ) and Hillsborough Stadium ( Sheffield Wednesday ), see The Kop .
- A village in Nottinghamshire was named "Spy Kop" after the battle.
- Numerous tombs and name plaques on the plateau commemorate the fallen.
See also
Web links
- The Great Boer War ( Memento of May 11, 2008 in the Internet Archive ) Arthur Conan Doyle: The Great Boer War , Chapter XV: Spy Kop
Individual evidence
- ↑ A contemporary of Warren described it as follows: "Slow, but confused, overly cautious, but indecisive and completely ignorant of the use of cavalry." Saul David: The biggest failures in military history , 5th edition, Heyne Verlag, Munich 2003, ISBN 3-453-86127-2 , p. 47.


