
Battle of Salamanca

Illustration by J. Clarke, colored by M. Dubourg
| date | July 22, 1812 |
|---|---|
| place | Salamanca in Castile-Leon , Spain |
| output | Allied victory |
| Parties to the conflict | |
|---|---|
| Commander | |
| Troop strength | |
| 51,939 men | 49,647 men |
| losses | |
|
5,214 dead, wounded and missing |
more than 14,000 dead, wounded and missing |
Bailén - Roliça - Vimeiro - Saragossa (1808) - Burgos (Gamonal) - Medina de Rioseco - Espinosa - Tudela - Somosierra - Saragossa (1809) - La Coruña - Torres Vedras - Valls - Braga - Oporto - Talavera - Ocaña - Gerona - Ciudad Rodrigo (1810) - Buçaco - Gévora - Barrosa - Badajoz (1811) - Fuentes de Oñoro - La Albuera - Tarragona (1811) - Sagunto (Murviedro) - Ciudad Rodrigo (1812) - Badajoz (1812) - Majadahonda - Salamanca - García Hernández - Venta del Pozo - Vitoria - Sorauren - San Sebastián - Bidassoa


The Battle of Salamanca on July 22, 1812 was an important victory for the Allied troops from Great Britain and Portugal under Wellington's command against the French army under Marshal Marmont's command . It took place near the hills of the Arapiles south of Salamanca in Spain ( Castile-León ) and is therefore also called the Battle of the Arapiles ( bataille des Arapiles ) in France .
background
The battle took place after a frustrating period of six weeks for Wellington. His advance into central Spain in the spring of 1812 was blocked by the Marmont army, whose strength increased as it received further reinforcements. Wellington had to decide whether to remain in Salamanca or to retire as he was in danger of being cut off from his supply lines to Portugal.
troops
Marshal Marmont's 50,000-strong Portuguese army comprised eight infantry and two cavalry divisions. They were commanded by Maximilien Foy , Bertrand Clausel , Jacques Thomas Sarrut, Antoine Louis Popon de Maucune, Claude François Ferey , Jean Pierre François Bonet, Antoine François Brenier de Montmorand and Jean Guillaume Barthélemy Thomières . The cavalry was under Pierre François Boyer and Jean-Baptiste Curto.
Wellington's 48,500 men consisted of eight infantry divisions and two independent brigades, five cavalry brigades and 54 cannons. The army included battalions of the King's German Legion (KGL), the Braunschweig , the Portuguese army and Spanish troops, as well as the light brigade under Carl von Alten . The infantry divisions were commanded by Henry Frederick Campbell (1st Division), Edward Pakenham (3rd Division), Lowry Cole (4th Division), James Leith (5th Division), Henry Clinton (6th Division), John Hope (7th Division) and the light division under Carl von Alten . Carlos de España commanded the Spanish division with 3,400 men and Generals Denis Pack and Thomas Bradford led the two independent Portuguese brigades. The British cavalry was commanded by John Le Marchant and George Anson , the KGL cavalry led by Viktor von Alten and Georg Bock .
March
Early in the morning of July 22nd, the French army moved south-west to the south of Salamanca and occupied the Great Arapile at around 8:00 a.m. Wellington moved in parallel and part of his troops occupied the Little Arapile. The two armies were about 1.7 km apart, but while Wellington could watch every move of the French, they saw almost nothing of his arrangements as his men stood behind the hill.
Marshal Marmont saw the chance to overtake Wellington and cut him off from Portugal. The French army was moving northwest along an angled line near the steep Great Arapile. The leading French division, Thomières, was already west of the Great Arapile and was now ordered to rush forward to encompass the Allied army. Behind the Thomières division, which was supported by Curto's cavalry, followed the divisions of Maucune, Brennier and Clausel. The Bonet, Sarrut and Boyer divisions remained in the center near the Great Arapile, while the divisions under Foy and Ferey remained on the right wing and on the short side of the angular formation facing west, facing the main Allied power. Wellington recognized the attempt to bypass the enemy and immediately ordered the counter-attack of his right wing, which was formed by the 3rd Division.
Wellington's attack
When Wellington learned of this overstretching of the French line, he ordered Pakenham's 3rd Division and the cavalry under D'Urban to attack Thomières. The 3rd Division faced the head of Thomières' division in a line formation two men deep. The French attacked in column and were stopped by the superior firepower of the British. Thomières was killed. When Macaune discovered British cavalry nearby, he formed his division into squares . This was a standard formation against cavalry, but poor tactic against infantry. Leith's 5th Division could easily defeat the French in their line formation in a musket duel. As the soldiers began to withdraw, Stapleton Cotton ordered Le Marchant's cavalry brigade to attack. Maucane's men were destroyed, and many of the survivors surrendered.
Le Marchant hastily rearranged his troops and sent them against the nearest French division, which was exhausted from an urgent march. The heavy dragoons destroyed Brennier's hastily formed first line, but Le Marchant had overworked his luck. He was killed while trying to destroy a square in Brenier's second line with his troops.
During this crisis, the French army lost its commander. Marmont saw the danger his army was in from Pakenham's attack and stormed to his horse. He was caught in a British grenade explosion that broke his arm and two ribs. His successor, Bonet, was also wounded shortly afterwards, and it took some time before his successor, Clausel, could be reached, leaving the French army without command for a considerable time.
Cole's 4th Division attacked Bonet's Division and Packs Portuguese the Great Arapile. Both attacks were repulsed by the French with the help of a forty-gun battery on the hill.
When the third commander Clausel was finally found, he did his best to save the difficult situation. He ordered Sarrut's division to secure the left flank. He then launched a dangerous counterattack on Cole's 4th Division, using his own and Bonet's divisions, supported by Boyer's Dragoons. This displaced the survivors from Cole's division and the 6th division in Wellington's second line. Marshal William Beresford sent William Spry's Portuguese Brigade of the 5th Division, while Wellington sent the 1st and 7th Divisions to help. After bitter resistance, the divisions of Clausel and Bonet were defeated. A general retreat began.
While the rest of the French army fled, Ferey formed his division in a three-man-deep line, which was covered on the flanks by a battalion in the square . Led by Clinton's victorious 6th Division, the Allies encountered this formation and were initially repulsed. After the artillery had taken the French line in a crossfire, Wellington ordered a second attack, under which Ferey's troops collapsed and the commander fell.
Foy's division covered the retreat of the French to Alba de Tormes , where there was a bridge they could use to escape. Wellington believed that this position was blocked by a Spanish battalion under D'Espana, stationed in a fortified castle. So he turned his pursuit of the enemy in a different direction. But the Spaniards had withdrawn their troops without informing Wellington. Therefore, the French managed to escape.
The French army had lost about 14,000 men, Ferey and Thomières had fallen, and Marmont, Clausel and Bonet had been wounded. The Allied army had lost 5,173 men, Le Marchant was dead, Beresford, Cotton and Cole were wounded.
Result
The Battle of Salamanca was a heavy defeat for the French, who had lost their reputation for invincibility. It was the beginning of the end of French rule in Spain.
The battle established Wellington as an offensive commander. "Our commander was everywhere and unfortunately exposed himself," wrote Packenham. In fact, a stray bullet hit his holster and got stuck in his coat.
Action at Garcia Hernandez
The next day, the heavy dragoons of the King's German Legion had the amazing success of destroying a square of infantry, twice more within a few minutes.
The 1st Dragoons attacked a square of the 76th, the second volley of which was fatal to the horse of Captain von der Betten , which fell into the ranks of the French. This created a gap into which the Dragoons rushed. The square fell into complete chaos and only 50 men escaped annihilation. The refugees tried to reach the square of the 6th light ones. This messed up this formation and the 2nd Dragoon KGL were also able to destroy this square.
This action, lasting only 40 minutes, is one of the most famous of the Napoleonic era. With a loss of 127 men (out of 700) the KGL had managed to cause 1,100 losses among the French. Together with Le Marchant's attack the day before, these cavalry attacks are considered to be the most successful of the Spanish campaign.
In another account, written in 1837, contemporary witnesses and documents report three squares that were smashed one after the other and around 1,400 French prisoners. The losses are also numbered differently there than in Fletcher's modern presentation and with the officers by name.
Imperial eagle
Two imperial eagles (22nd and 101st), the most important symbols of the French regiments, were captured, plus six regimental flags and 20 cannons.
gallery

Arthur Wellesley, Duke of Wellington. Oil painting by the Spanish painter Francisco de Goya
Auguste Frédéric Louis Viesse de Marmont, portrait of Jean-Baptiste Paulin Guérin

William Carr Beresford, Viscount Beresford

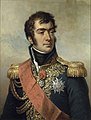
Bertrand Clausel

Maximilien Foy


.jpg)


literature
- North L. Beamish. History of the King's German Legion . Naval & Military Press, Dallington, East Sussex 1997, ISBN 0-9522011-0-0 (2 volumes, reprint of the London 1832-37 edition)
- German Edition: History of the Royal German Legion . Barsdorf Publishing House, Berlin 1906 (2 vols.)
- Ian Fletcher: Salamanca 1812. Wellington crushes Marmont . Praeger, Westport, Conn. 2005, ISBN 0-275-98615-2 .
- Michael Glover: Wellington's Peninsular Victories . The Windrush Press, Moreton-in Marsh 1996, ISBN 1-900624-01-X .
- Charles W. Oman: A History of the Peninsular War . Greenhill Books, London 2004 (7 vols.)
- Vol. 5 October 1811 to August 31, 1812. Valencia, Ciudad Rodrigo, Bajadoz, Salamanca, Madrid . 2004.
- Julian Paget: Wellington's Peninsular War. Battles and battlefields . Pen & Sword Military, Barnsley 2005, ISBN 1-8441-5290-1 (reprinted London 1996 edition).
- Jac Weller: Wellington in the Peninsula. 1808-1814 . Greenhill Books, London 1992, ISBN 1-85367-127-4 .
Remarks
Web links
- Details on battle of Salamanca (in English)
- Includes British and allied OOB (in English)