Battle of the Sunda Strait
| date | February 28 to March 1, 1942 |
|---|---|
| place | Sunda Strait between Java and Sumatra |
| output | Japanese victory |
| Parties to the conflict | |
|---|---|
| Commander | |
| Troop strength | |
| 2 cruisers 1 destroyer |
3 cruisers 9 destroyers mine sweeper and transporter for landing on Java |
| losses | |
|
2 sunken cruisers |
1 sunken minesweeper |
1. Borneo - Manado - Tarakan - Balikpapan - Ambon - Makassar - Sumatra - Palembang - Badung - Timor - USS Langley - 1. Java Sea - Sunda Strait - Java - 2. Java Sea - U 168 - U 537 - U 183 - Ashigara - 2. Borneo
1941
Thailand - Malay Peninsula - Pearl Harbor - Hong Kong - Philippines - Guam - Wake - Force Z - Borneo
1942
Burma - Rabaul - Singapore - Sumatra - Timor - Australia - Java - Salamaua - Lae - Indian Ocean - Port Moresby - Coral Sea - Midway - North America - Buna-Gona - Kokoda-Track
The battle in the Sunda Strait took place from February 28 to March 1, 1942 in the Sunda Strait between Java and Sumatra . The ships of the ABDA fleet and Japanese units left over from the battle in the Java Sea were involved.
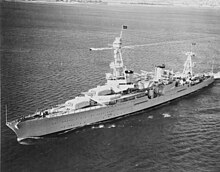
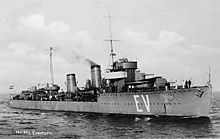
The American cruiser USS Houston and the Australian cruiser HMAS Perth were spotted by Japanese destroyers who formed the cover group for the landings in western Java as they tried to escape the war zone through the Sunda Strait. They were followed by the Dutch destroyer Hr. Ms. Evertsen , who was subsequently also discovered by the Japanese. All three ships were lost.
prehistory
At the beginning of December 1941, the Japanese began their expansion into the Southeast Asian region. This also threatened the Dutch and British colonies as well as Australia. After the attack on Pearl Harbor , the US also entered World War II . To defend the area concerned, the ABDACOM was founded, which also had a fleet consisting of units from the associated states. When the Japanese started their invasion of Java at the end of February 1942, the battle in the Java Sea off East Java broke out, in which the ABDA fleet was effectively smashed by the Japanese. Admiral Karel Doorman ordered the two cruisers USS Houston and HMAS Perth to return to Batavia, today's Jakarta, towards the end of the battle . They arrived there about two hours after midnight on February 28th.
A smaller formation consisting of the cruisers HMS Danae , HMS Dragon , HMAS Hobart and the destroyers HMS Scout , HMS Tenedos and Hr. Ms. Evertsen , attempted to advance the Japanese invasion fleet in eastern Java on the night of February 28th. After this failed, the ships fled south through the Sunda Strait without being bothered by Japanese ships. The Mr. Ms. Evertsen returned to Batavia after being separated from the other ships by a storm.
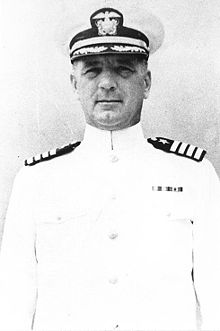
The two commanders, Albert H. Rooks of the USS Houston and Hector Waller of the HMAS Perth , requested fuel and a supply of ammunition in the port of Batavia . Both were very scarce and reserved for the Dutch ships normally anchored there. Only after the Port Authority of Tanjung Priok found out about the sunken Dutch ships, they released 300 tons of fuel for the Perth , so that they came to around 50% of their total capacity. The Houston was not refueled because it had enough fuel for a trip to Australia. But since no ammunition could be loaded, the Houston only had 50 rounds, and the Perth only had 20 rounds for all guns.
Around 2 p.m. Admiral Conrad EL Helfrich gave the two cruisers the order to run to Tjilatjap in the south of Java , accompanied by the Evertsen who had meanwhile arrived . To do this, they should drive through the Sunda Strait. Helfrich wanted to collect the remains of the ABDA fleet in Tjilatjap, but without the British ships, which had meanwhile received the order to withdraw to Colombo .
The last reconnaissance reports, from the afternoon of February 28, reported the Sunda Strait as free of Japanese ships that had been sighted around ten hours away. The Houston and Perth lifted anchor at 7:00 p.m. in the evening and reached the open sea half an hour later, where they were ordered to set a course in a north-westerly direction in order to avoid a sighting by the Japanese landing units off Kragan . Commander Waller, the higher-ranking officer, decided to take a direct west course to Sunda Strait. The Evertsen under Commander WM de Vries followed the two ships an hour later, although she was intended as a destroyer escort. Some sources report that the Evertsen had not finished refueling when the cruisers cast off. Other sources speak of communication difficulties when transmitting commands.
Meanwhile, the Japanese tried to stick to their strict schedule for their ventures in Southeast Asia. The Java invasion was scheduled for the early morning of March 1, and the arrival of the troop carriers and their escort ships of the Western invasion fleet in the north of Bantam Bay was scheduled for 1:00 a.m. The fleet was divided into three parts:
- Ten transporters accompanied by the light cruiser Yura and the 22nd destroyer division with Fumitzuki , Minatzuki , Nagatsuki and Satsuki drove towards Ajner Lor .
- The light cruiser Sendai was en route to Semarang with the 20th Destroyer Division, which included Amagiri , Asagiri and Yugiri .
- The main invasion force arrived in the late evening of February 28 outside St. Nicolaas Point at the entrance to the Sunda Strait. Six transporters set course for Merak on the west side of St. Nicolaas Point, and 27 transporters drove directly into Bantam Bay to drop the 2nd Infantry Division there.
The heavy cruisers Mikuma and Mogami , the light cruiser Natori and the destroyers Asakaze , Hatsuyuki , Murakumo , Shikinami , Shirakumo , Shiratsuyu and Shirayuki patrolled north and west of the landing areas for protection . In the east the Fubuki cleared up, and in the bay there were also the Harukaze and Hatakaze with a division of minesweepers . Further north on the high seas the aircraft carrier Ryūjō and the seaplane tender Chiyoda formed a cover screen together with the heavy cruisers Kumano and Suzuya and the destroyers Isonami , Shikinami and Uranami .
The battle
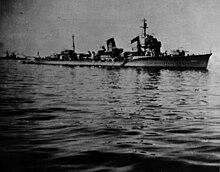
At around 10:15 p.m. the Fubuki sighted the approaching cruisers, but could not initially clarify their identity. At that time it was located around 2.2 kilometers east of the small island of Babi, which is 21 kilometers northeast of St. Nicolaas Point. The commander of the Fubuki , Yamashita Shizuo, decided to use the island as cover and to watch the unknown ships as they circled.
The weather at night was good. When the sea was calm, the moon was full and visibility was excellent, the crew of the Houston ahead could turn out the lights of St. Nicolaas Point and believed they had safely reached the entrance to Sunda Strait. But suddenly the dark outlines of some ships appeared on the horizon . Rooks had been informed of the possible presence of some Dutch patrol boats, but the speed of the silhouettes led him to conclude that these could only be Japanese ships. Therefore, he set off a combat alarm on board.
At about this moment the Perth spotted the Fubuki , who was now some distance aft behind her. Commander Waller flashed the Fubuki by means of light signals , which it only responded with a few flashes of green light. Waller interpreted the lightning as hostile and immediately opened fire on the Fubuki . The Fubuki turned off at 10:45 p.m. and left behind a wall of smoke for protection. From a distance of 2700 m she shot nine torpedoes in the direction of Perth and then set north course. Waller and Rooks had now finally realized that they had gotten into the middle of the main landings of the Japanese western invasion fleet and opened fire on the ships in Bantam Bay.
Only the Harukaze and the Hatakaze stood ready to protect their own transporters, as the other forces mainly operated in the north and west. The Harukaze picked up speed and fogged the entrance of the bay around 10:30 p.m. Through this fog, the Hatakaze set course north in order to have a better view of the enemy ships in front of the bay. The two Allied cruisers avoided the torpedoes that the Fubuki had shot down by a narrow circular course. Then they directed their journey back to the entrance to the Sunda Strait. They fired at the barely visible ships in the bay.
At 10:52 p.m. the Hatakaze began to return fire and with the arrival of the Shiratsuyu from the northwest, the balance of power in the fight began to shift in favor of the Japanese. The Shiratsuyu opened fire from about 3,200 m away . She was in a position north of St. Nicolaas Point. The light cruiser Natori , together with the destroyers Hatsuyuki and Shirayuki , also began to cover the Allied ships with grenades, while they continued to pick up speed and steadily reduce their distance to them. The Asakaze had crossed north of the Hatakaze and Harukaze and was now joining them. The heavy cruisers Mikuma and Mogami , followed by the Shikinami , were also on their way to the combat zone, but were still more than nine kilometers to the northeast. From the west the Murakumo and Shirakumo approached at a distance of 6400 m .
At the time, the Houston and the Perth were still 4,500 m east of St. Nicolaas Point. They turned south and ran parallel to the Japanese transporters in the bay for about eight minutes. During this phase of the fight, they did some damage under the landing craft while remaining undamaged themselves.
When the two cruisers approached Penang Island off Bantam Bay at 11:08 p.m., they were forced to turn north. The Japanese ships drove towards them in a row of three and within the next eleven minutes shot down 28 torpedoes in the direction of the Allied ships. They tried to defend themselves with whatever means they could and the Perth shot her last four torpedoes herself. The enemy ships kept coming closer to each other, getting so close that they hit the decks with mutual machine gun fire .
The Houston suffered the first hit, which hit the bridge and started a fire, while the Perth remained largely unscathed except for three smaller hits. In return, she was able to damage the Harukaze at the helm and the Shirayuki on the bridge with her ship artillery. When the Japanese heavy cruisers joined the fighting at 11:19 p.m., they shot six torpedoes at the Perth from a distance of 8,500 m and then turned on the opposite course near the island of Babi. At the same time, the two Allied cruisers turned back to St. Nicholaas Point, but had no more ammunition for their gun batteries. They only fired training grenades and flares. Only minutes later, the Japanese heavy cruisers opened fire intensely from their guns from a distance of almost eleven kilometers. The scenery was illuminated by the destroyers' searchlights. The Mikuma had to cease fire for a short time because of an electrical damage, but after a few minutes she intervened again.
The decision-making phase began at 11:26 p.m. when the Harukaze and Hatakaze shot down five and six torpedoes respectively, and four minutes later the Murakumo and Shirakumo each shot down nine torpedoes. The first impact hit the Perth at full speed, killing all but one crew member in the forward engine room. Two more torpedoes struck the front magazine and the area under the rear turret at 23:35. Waller immediately ordered the ship to be abandoned, but suddenly a fourth torpedo struck and caused the Perth to sink at 11:42 p.m. 4800 m east-northeast off St. Nicolaas Point. 351 of the 686 crew members died with Commander Waller. Another 106 perished in the subsequent Japanese captivity .
Meanwhile, at 11:27 p.m. , the Mogami had shot down six torpedoes on the Houston. This salvo was later described as one of the most effective of the Pacific War, as all six torpedoes found a target. Although they missed the Houston and ran into Bantam Bay, the Japanese transporters were lying there. A few minutes later, six heavy explosions lit the bay. The transporters Horai Maru , Sakura Maru , Tatsuno Maru and Ryujo Maru (often also called Shinshū Maru ) sank in the shallow water of the bay. The last two were later lifted again by the Japanese. The Japanese mine sweeper W2 was also hit and sank.
The Houston now continued the fight alone. Since Rooks saw no way to escape, he let the cruiser set course again for the Japanese transporters. The ship received its first serious hit at 11:40 p.m. when a shell struck the engine room and killed the entire crew there. Shortly thereafter, a torpedo hit by the Murakumo or the Shirakumo . The ships fought from such a close range that a crew member of the Houston even managed to shoot out a searchlight on a Japanese ship with his rifle. Since the Japanese had some difficulty distinguishing the Houston from their own ships and self-illuminating each other, the Houston gunners managed to get some hits on the Harukaze , Shirakumo and Shikinami .
The Houston was hit at the second turret ten minutes before midnight . A fire broke out and the two magazines were full of water. The central fire control system failed, and at 0:20 a.m. on March 1, 1942, the last still functioning turret was hit. When three torpedoes struck shortly afterwards, Commander Rooks ordered to leave the ship. Half an hour after midnight, a shell exploded near the bridge, killing rooks from flying debris. After another torpedo strikes and shelling that sank Houston against 00:45 in the Java Sea . Of the 1,061 men of the crew, only 368 survived and were captured by the Japanese.
Four marines were killed on the Japanese ships in the battle. Another 26 were wounded. The damage to the ships was relatively minor. The shikinami was damaged by a close hit on the screw and therefore only reached 24 knots . The hardest hit was the Harukaze , which showed damage to the bridge, the engine room and the rudder. It is not known how many victims there were among the transporter crews.
Loss of Mr. Ms. Evertsen
An hour after the Houston and Perth left the port of Tandjong Priok, the Evertsen followed the two cruisers. Commandant WM de Vries had received the order from Admiral Helfrich to escort the two ships, but was only able to leave late due to an engine failure. Commander Waller of Perth had ordered the Evertsen to a position a kilometer in front of his ship, but when the Dutch destroyer reached the Java Sea, the two cruisers were already out of range. So she set course towards Sundastrasse and tried to catch up with her.
After a few hours the Evertsen crew could see the lightning bolts of battle on the far horizon. Their commanding officer decided not to be drawn into the fighting and tried to bypass the scene in order to enter the Sunda Strait. The Evertsen succeeded in doing this until it reached the islands "Dwars in den Weg" (also Middle Island, or Sungian), which are roughly in the middle of the Sunda Strait. Two ships had set course for the destroyer and were running towards him at high speed. The commander first suspected that these were the two Allied cruisers, but when one of the ships switched on a searchlight and opened fire, he realized that it could only be Japanese destroyers. He immediately turned around and ran the Evertsen out of Sunda Strait at full speed. In this way he managed to escape the Japanese.
The Japanese ships were the two destroyers Murakumo and Shirakumo , which had been deployed to cover the western flank for the landings in Bantam Bay.
On a further east course, the Evertsen tried again a short time later to enter the Sunda Strait. The two Japanese destroyers, however, again made them out and opened a targeted artillery fire. The Evertsen could not gain enough speed to escape the Japanese. This was due to the fact that she only drove with two of her three steam boilers, since her commander wanted to keep the smoke development as low as possible. It was possible to detach the destroyers by laying a smoke barrier, but in the meantime seven hits have been recorded. The stern was on fire, the first boiler room had been hit and the speed was therefore further reduced. She continued to head for Sumatra, but the Japanese destroyers caught up and opened fire again. Since the fire control system now collapsed and the fire spread to a magazine that could not be flooded, the commander decided to put the ship on a reef off Seboekoe Besar . After all torpedoes had been fired and the secret codes had been thrown overboard, the crew managed to go ashore. The rear magazine of the Evertsen exploded shortly afterwards, tearing almost the entire stern with it.
Many Dutch people were captured by Japan around March 9th, some managed to flee the island to Sumatra, and there has been no trace of the rest since then. The commander of the Evertsen died in April in captivity.
After the battle
The crew members of the Houston and Perth , who had been rescued and taken prisoner of war, were transported by the Japanese army together with Dutch units to Thanbyuzayat from October 1942 to build the railway line between Thailand and Burma (→ Death Railway ) . There they were housed in various camps. After the construction of the railway was completed, the Japanese reloaded some of the survivors onto transporters that were to take them to Korea or Manchukuo .
The Houston and Perth were missing for a long time because they had not intercepted any radio messages. Only the Evertsen could still send a radio message, which was also received on Java. So their whereabouts were known. Only years later, when a Japanese transporter (→ Hell Ship ), which was supposed to take prisoners of war to Korea, was torpedoed by sea, could Australian survivors of the Perth be rescued. They reported the fate of their own ship, but knew nothing about the whereabouts of the Houston . After the prisoners of war were liberated in Burma and Thailand, the whereabouts of the Houston could also be clarified.
consequences
With the sinking of the last two large ships in the ABDA fleet, the former ABDACOM , which had already been officially dissolved on February 25, 1942, had virtually no means of defending the Southeast Asian region. The British had ordered their ships back to Ceylon and the Australians their units to Darwin . Java surrendered after a few days, and with the exception of New Guinea and the Solomon Islands , all islands were in Japanese hands until mid-1942.
literature
- WG Winslow: The Ghost That Died at Sunda Strait. Naval Institute Press, 1994, ISBN 1-55750-927-1 .
- Gordon L. Rottman : Japanese Army in World War II. Conquest of the Pacific 1941–42. Osprey Publishing, 2005, ISBN 1-84176-789-1 .
Web links
- Battle description on www.microworks.net (English)
- The loss of HMAS Perth, March 1, 1942 - Lecture by Dr. Peter Stanley in the Australian War Memorial (2002) (English)
- Captain Hector Macdonald Laws Waller, DSO (and Bar) (1900–1942) - biography of Commander Waller of HMAS Perth (English)
- The USS Houston in the Pacific War (English)
- Battle description (English)
Individual evidence
- ^ L. Klemen: The Sunda Strait Battle . In: The Netherlands East Indies 1941–1942 . Archived from the original on December 3, 2014. Info: The archive link was inserted automatically and has not yet been checked. Please check the original and archive link according to the instructions and then remove this notice. Retrieved February 10, 2011.
- ^ IJN Fubuki: Tabular Record of Movement at: combinedfleet.com , accessed October 14, 2006
- ↑ Note: The sunken minesweeper W2 has been attributed to a mine or even a hit by the USS Houston in other sources , but this is very questionable.
- ↑ Battle of Sunda Strait by Vincent P. O'Hara at microworks.net , accessed October 15, 2006


