Third Isonzo Battle
| date | October 17, 1915 to November 3, 1915 |
|---|---|
| place | Massif of the Krn to the Adriatic Sea |
| output | Italian offensive fails |
| Parties to the conflict | |
|---|---|
| Commander | |
|
Pipe by Denta |
|
| Troop strength | |
| 137 battalions + 47 battalions reinforcement 634 guns (including 40 heavy) |
338 battalions 1,372 guns |
| losses | |
|
40,000 men dead, wounded, missing |
62,466 men dead, wounded, missing |
1915
1st Isonzo - 2nd Isonzo - 3rd Isonzo - 4th Isonzo - Lavarone (1915-1916)
1916
5th Isonzo - South Tyrol offensive - 6th Isonzo - Doberdò - 7. Isonzo - 8. Isonzo - 9th Isonzo -
First Dolomites Offensive - Second Dolomites offensive -
Avalanche disaster
1917
10th Isonzo - Ortigara - 11th Isonzo - 12th Isonzo - Pozzuolo - Monte Grappa
1918
Piave - San Matteo - Vittorio Veneto
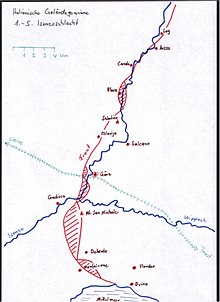
The Third Isonzo Battle between the armed forces of Austria-Hungary and Italy took place between October 17 and November 3, 1915. The area affected stretched from the Krn massif to the Adriatic coast and was the same area that had been affected in the two previous Isonzo battles. The Austrian troops still ruled the heights of the Doberdo, Podgora and Sabotin, the ridges of the Tolmein bridgehead , the Mrzli Vrh and the Krn. On the Doberdo plateau, the line taken by the Austrians between Monte San Michele and Monte dei Busi had been retracted somewhat for the purpose of straightening the front .
Strategic intention
As a result of the visit of the French General Joffre to the Italian front from March 3rd to 8th. September 1915 and the resulting consultations between the Italian and French army command, a new general attack by Italy against Austria-Hungary was scheduled. The purpose of this attack was to tie up Austro-Hungarian armed forces and thus indirectly support Serbia , against which a German-Austrian-Hungarian-Bulgarian offensive had already started on September 21, 1915 . In addition, Italy wanted to get rid of the charge of not having participated in the operation against Saloniki. On October 15th the bombardment by the Italian artillery began and on October 18th the first infantry attack took place.
Attack groups
The 3rd Italian Army under the command of General Duke of Aosta was deployed in the Gorizia section and the 2nd Army under General Frugoni in the area of Monte Krn. Behind it stood the 1st Army, which was also to be used later as a reserve . Nine army corps with 24 divisions and additional independent Alpini and Bersaglieri departments were involved . So a total of about 338 battalions and 130 squadrons and 1372 guns .
Operational situation
From the beginning it became clear that Italy intended a breakthrough operation, which was to condense into one battle from several smaller skirmishes. As in previous battles, the main thrust was directed against the area from Tolmein to the sea. The terrain was divided into three sections, the Tolmein bridgehead, the Gorizia bridgehead and the Doberdo plateau.
Accordingly, a distinction can be made between three temporal phases: the first from October 18 to 22, mainly with fighting on the Krn and the Tolmein bridgehead; the second phase, from October 22nd to 26th, during this period the Italians did not attack with full force and only carried out sporadic attacks against the Tolmein bridgehead and the Doberdo plateau. On its southern section, large Italian losses after attacks on Vermigliano and supply difficulties due to the bad weather conditions led to the cessation of the fighting. After recruiting strong further forces from the Tyrolean and Carinthian fronts, the third phase began on October 28 with extremely strong attacks on the Gorizia bridgehead, which lasted until November 3.
The battle
Long before the start of the battle, the Austro-Hungarian Evidence Bureau had noticed extensive troop movements that were correctly assessed by the General Staff . Therefore, this attack did not come as a surprise, as defectors in particular had reported imminent actions. As early as October 13th, the Italians scanned the Austrian positions near Marcottini with infantry attacks. On October 17th, the Italian artillery began bombarding the Austrian trenches. This increased to a barrage and lasted until October 21st. On the same morning the infantry (it: Fanti) of the mobile militia regiment No. 119 attacked with three battalions at Santa Lucia for the first time. Opposite them was a battalion of Hungarian infantry - regiment " William I German Emperor and King of Prussia ." No. 34 from Kosice and Rogatica, which could fend off the attack in close combat. With more and more troops, the Italians finally succeeded in penetrating the Austro-Hungarian positions on Monte San Michele. Since this mountain was the key position for the entire defense of the Gorizia bridgehead (if Italian artillery had been posted it would have been possible to shoot the defenders of the Podgora from behind), the Austrian leadership decided to recapture the trenches under all circumstances. The Hungarian infantry regiment " Rupprecht Kronprinz von Bayern " No. 43 from Weißkirchen and Karánsebes was assigned , which initially occupied the middle and northern crest of Monte San Michele with two battalions. Meanwhile two companies of the same regiment attacked the southern ridge held by the Italians. The whole night until the next morning they were able to fend off the Romanians (the kuk InfRgt 43 consisted mainly of members of the Romanian part of the population) until they received reinforcements around nine o'clock and were able to throw the Fanti down from the hilltop. Immediate counterattacks throughout the day were unsuccessful.
After the somewhat calmer second phase of the attack, the concentrated actions began again from October 28th. The Italian artillery had been firing at all calibers since about 8 a.m. that day. The fire was directed in particular against the Görz bridgehead, which was to be conquered at all costs. But also towards the Monte Sabotino and the back of the Podgora it increased to a barrage around noon. After six hours of artillery preparation, the Italians attacked Monte Sabotino with five to six battalions and strong reserves. In the southern area of this section of the attack, the Austro-Hungarian trenches were broken into, but the attackers were immediately thrown out again in a counterattack. Strong Austrian machine gun and artillery fire forced the bulk of the Italian infantry to turn back, with heavy losses. Another attack by reserve units that had been provided could no longer be carried out. On the Podgora, strong Italian units penetrated the trenches of the defenders in places, at some points they even reached the ridge line until they were thrown back from Zara by the Dalmatian Imperial and Royal Landwehr Infantry Regiment No. 23 . An attack planned against the Pevma area collapsed in the defensive fire of the artillery.
After the strongest artillery preparation, the infantry attack began against the Doberdo plateau at around 3 p.m. InfRgt 43 was able to successfully repel two serious attacks on Monte San Michele. Likewise, repeated attacks on San Martino and the adjoining section of Monte dei sei Busi were repulsed by the kk Landwehr Infantry Regiment No. 3 from Graz and Marburg , with great losses for the attackers.
After the first phase of the major attack, the Italian 3rd Army attacking the south wing had about two army corps in reserve. These associations have now been used. Attacks on the Monte Sabotino and the Podgorahöhe with the strongest artillery support could be repulsed by the LWIR 23, the kk Landwehr Infantry Regiment No. 37 from Gravosa and parts of the Galician Infantry Regiment "Schoedler" No. 30 from Lemberg . Further local attacks in the northern section of the Podgora heights collapsed in the Austro-Hungarian artillery fire. The trenches still in the possession of the Italians near San Martino were recaptured on October 29th by the Hungarian Infantry Regiment "Freiherr von Conrad" No. 39 from Debreczen and the Hungarian military police battalion No. 24 from Rovigno . In the last days of October there was still fierce fighting at numerous points on the Isonzo front. The Italians tried several times to attack the Krn, but were turned away with great losses. The same was true for the Tolmein bridgehead area. Equally in vain were attacks by the Bersaglieri on October 31 against the front from Auzza to Monte Santo. The Monte Sabotino has not been attacked in the last few days, but the Italians tried in vain to push in the bridgehead of Gorizia with massive attacks against the Austro-Hungarian positions near Pevma and on the Podgora. Although the defenders' positions were continuously under heavy artillery fire, the attackers were unable to gain a foothold anywhere. As early as October 30th, strong Italian forces marching over Sagrado and moving towards Sdraussing were observed. The following night there was violent hand-to-hand fighting on the northern slope of Monte San Michele. On the afternoon of October 31, another massive attack began here with strong artillery support. However, this was successfully repulsed by the Budapest Honvéd Infantry Regiment 1 and the Nagyvárader HIR 4 . Further attacks against the section south of Monte San Michele collapsed in artillery fire.
Despite the enormous loss of people and material, the Italian command put everything together again to deliver a decisive blow. Due to the decreasing fighting power of the Fanti, the core area of the battle was reduced more and more, which however led to a concentration in the attacks on the bridgehead of Gorizia. At least two additional brigades from the Tyrolean combat area had been identified by the evidence office here. According to the report of the Austro-Hungarian war press Quarter of 3 November 1915, the Monte Sabotino, Oslavija were on 1 November after heavy barrage twice again and the position west four times unsuccessfully attacked by Pevma. At the same time, heavy barrage was directed against the areas behind the Austro-Hungarian front and against the western part of Gorizia. Strong relief attacks against the Plava area and the northern part of the Doberdo plateau were intended to support the main thrust. Five Italian regiments competed against the San Martino area and penetrated into the Austrian trenches. From there they were driven out again in a counter-attack. November 2nd and 3rd were also filled with repeated Italian attacks, particularly against Podgora. The Italians stormed the positions of the Hungarian Infantry Regiment " Archduke Friedrich " No. 52 from Brod ad Save , Ragusa and Fünfkirchen six times on the afternoon of November 3rd , each time they were turned away with considerable losses for the Italians. In front of this section of the front alone, more than 800 attackers were counted.
In addition to these efforts aimed at the Gorizia bridgehead, the Italians repeatedly made strong attacks on the northern part of the Doberdo plateau and against Zagora. However, their efforts were nowhere crowned with success.
The attacks against Flitsch (Italian: "Plezzo") and Tolmein at the same time also collapsed with heavy losses.
On the Italian side, the casualties are given as 62,466 dead, wounded, missing and prisoners. Austria-Hungary gives about 40,000 dead, wounded, missing and prisoners.
swell
- Austrian State Archives / Vienna War Archives
literature
- L'esercito italiano nella grande guerra (1915-1918). Volume I-III. Ministero della Guerra - Ufficio Storico, Rome 1929–1974. Digitalizzazione del Rapporto Ufficiale with links to the full texts of all 10 books.
- CH Baer: The war of nations. Eleventh volume. Stuttgart 1917 ( online )
See also
Footnotes
- ↑ However, writing of the kuk Militäradministratur to 1918 since the spelling reform of 1996 as Field Marshal Lieutenant referred
- ↑ Page 417 of the print version = p. 454 of the digital version: Autumn offensive (October 18 - December 2) on the 'Fronte Giulia'


