
Spawn
The term Schiftung refers to the targeted spatial arrangement of wooden parts, especially roof structures. She is one of carpenters applied, geometric intersection of woods in the area and in the room. In wood construction , it is a craft technique that is used to identify inclined woodworking .
The cladding is part of the beam and is used, for example, to produce a roof structure in order to ensure a flat, uninterrupted transmission of force. An alternative to piling is mathematical joinery, or EDP-supported joinery using joinery software .

Origin of the term
The word Schiften (English: to shift ) comes (from the shaft ahd. Scaft = barked branch) - hence the rafter or Schiftsparren , a special rafters who has an inclined portion to a hip rafters , valley rafters or Gratkehlsparren to join.
Another, much more logical, explanation is that the word writing comes from crooked. Exactly those woods that are connected "crookedly" to the rest of the construction are called Schiftung in the umbrella term. See also shafts , which are chamfered to create an enlarged connecting (adhesive) surface.
Historical development

Traditionally, the scaffolding was tied to the drawing floor when joining, that is, a crack in a building plan ( construction drawing ) was torn out on the drawing floor in order to have the dimensions of the individual parts and their fitting together available on site during production and / or assembly . Hence the term joinery for tearing and working out the wood. The profile of a roof was laced or tied (tied) in its true size using chalk or color-soaked cords.
Today , even the most complex construction is created in 3D with the most modern software, the so-called joinery programs ( joinery software ) . You can move virtually through the individual rooms in the planned project and examine every detail from all sides. The data determined by the joinery programs can then be transferred to CNC or joinery machines . These process complicated wood connections with millimeter precision. The joinery programs have become irreplaceable, whether traditional wooden structures or entire houses, halls and bridges in timber engineering have to be produced.
Methods
A distinction is made between two methods of foundation, profile or plumbing and surface foundation:
The profile or plumb line
The plumbing, an older term is also Schiftung according to Werksatz (floor plan) and Lehrgespärre (rafter profile), is certainly the oldest method. Above all, it is the one that is most frequently used in practice. It is based on the representing geometry and only shows the relationship between different views.
In which the basic view ( floor plan ) and profile views (rafter profile) are positioned according to the rules of the representational geometry , so that relevant points can be transferred from the profile to the ground and vice versa.
Example of soldering

If a roof is inclined on all sides, i.e. there are no vertical gable walls, the carpenter speaks of a hipped roof . If a rafter (rafters are always at right angles to the horizontal eaves ) embodies a diagonal in this hipped roof, a hip rafter is a room diagonal. With the same height that is surmounted, the rafter has a larger basic dimension as a room diagonal , i.e. a different, smaller incline. It follows that the rafter must be carried out separately, that is, it must be shown in profile, in true size. From the intersections of the rafter with a purlin in the plan, which you now plumb into the ridge profile, you get the horizontal grooves that determine the mostly inclined claw.
Basic shift

If roof surfaces with different inclines meet in a hipped roof, you also get different burrs or recesses .
The main purpose of the ridge or valley floor shift is to make optimal use of the material. Since the assessment basis in statics is based on the smallest (full) cross-section , one tries to bring the deburring height to one level.
In addition, the ridge or valley base displacement makes marking and finishing easier. Since the deburring height on hip rafters is the same on both sides, or the groove depth on valley rafters is measured on both sides from the upper edge. In the example image you can see the material requirement on the left, the processing without and on the right with the basic shift in the middle.

For example, the displacement is determined using a hipped corner with roof slopes, main roof 45 ° and hipped roof 51.3 °, proceeds as follows:
Tear at right angles to the ridge line through the intersection of the eaves and remove the full width of the rafter on both sides. Now you stitch through the newly gained points, each parallel to the opposite eaves. The points of intersection with the eaves are now the seizures (starting points) of the displaced rafter edges.
The "method" of stabbing at right angles from the removed hip rafter width to the nearest eaves only works with a right-angled house and is therefore wrong. If the roof slope is 45 ° on the right-angled house, the base angle is the same as the roof slope on the other side.
Witch's cut
.jpg)
Since the hip or valley rafter is less inclined than the rafters or rafters from the main and hipped roof, it gets the so-called witch's cut on the eaves side . This does not apply to vertical and horizontal eaves heads. If the main and hipped rafters are provided with an angled rafter head (eaves section) and these cutting directions are transferred to the rafters, it is called a false witch's cut.
With the true witch cut one assumes one cutting direction (e.g. main roof) and cuts off the other roof sides with the same angle to the horizontal. This has the advantage that right- angled front planks run all around with the same width and the same inclination. The witch's cut got its name from the fact that the uninitiated must feel like witchcraft.
Claw Spaulders

The claw moldings can be used in both the plumb and surface moldings.
The claw formation is a formation method that is used when either the vertical height of the hip rafter is less than the vertical height of the scraper , or the valley rafter is lowered instead of being grooved. The usual layering method with a nailed jaw bevel (solder bevel) should not be used here. A claw is determined by intersecting the corresponding edge of a claw-generating component (the lower edge for hip rafters and the upper edge for valley rafters) with the upper and lower edge of the component that steals on or under (ship rafters). In the traditional hand-made joinery , the hoof charade has almost died out. Even with machine prefabrication using beam processing systems or beam processing machines , the more complex processing is often foregone.
However, this wood connection is highly recommended for visible wooden structures . In addition, hoof moldings are often part of master craftsman or journeyman exams to test the craftsmanship of the examinees.

Throat Claw Spaulders
In order to create a throat claw in a throat shifter (then throat claw shifter), the upper edge of the throat rafter is intersected with the upper and lower edge of the shifter. The rule to be followed is that the intersection must always be at the same height. As in the example of the throat claw footing (Fig. 1), the eaves height . This intersection of the scales below now runs parallel to the component that creates the claw. (Valley rafters)
The baking bevel is normal on the intersection outer edge shifter with outer edge valley rafters determined ( solders ) and perpendicular torn (soldered) to the profile to the profile base. The balance is obtained by bringing the intersection points of the outer edge Schifter with the valley line (balance above) and the outer edge Schifter with the intersection line you have just created (balance below) to the intersection and plumbing them into the profile. "Balance above" is intersected with the upper edge of Schifter and the lower edge of the balance with the lower edge of Schifter. If you connect these, there are two intersections with the two perpendiculars, the connection of which forms the intersection between the perpendicular and the scales.
Ridge Claw Spaulders

The behavior of the ridge claw shifters is the same, except that here, instead of the upper edge of the valley rafter, the lower edge of the rafter is decisive.
The surface protection

In contrast to plumbing, surface padding is the much more recent method, although this also looks back on several centuries. The surface padding builds on the solder padding, bringing a new dimension into play. Here not only the base and profiles are displayed, but also the individual roof areas unfolded in their true size. This makes it possible to tear pieces of wood that are tilted in the floor plan and displayed distorted .
The marking of perpendicular, inclined pieces of wood is not possible with the surface layering, as these are only located in the surface due to their burrs. However, it is necessary to determine the respective edges (e.g. of the hip rafter in relation to the top and bottom edge of the rafters) so that the connections to adjacent components can be made. So you can not tear wood that is perpendicular in the surface and not tilted with the plumb line. The only exceptions to this are normal rafters and horizontal bends, which have to be torn both in the perpendicular and in the surface layering.
Example of surface shading

If a roof area in a roof construction is covered with tilted rafters, it is necessary to fold out this roof area, i.e. to display it in real size. For this purpose, all of the pieces of wood in the plumbing should already be removed, as can be seen in the picture "Floor plan with profiles as a template from the plumbing".
It is advisable to choose the eaves line as the rotation or folding axis, as this height is available in all profiles and it appears more logical to the observer to lay the surfaces over the eaves instead of folding around ridge, valley or even ridge lines. One of the most important rules for surface shifting is that points always move at right angles to the axis of rotation between the ground and the surface, and that all points on the axis of rotation are constant.

To unfold the main roof area from the example, you pierce a circle in the eaves point of the main rafter profile and draw a circle from the ridge point to the bottom of the profile. This corresponds exactly to the rotation movement, as if you were to lay the roof surface flat on the ground.
This folded ridge point is now projected into the floor plan and forms the ridge line area . The ridge points (seizures) of the ridge and valley line in the ground now move at right angles to the axis of rotation (eaves) from the ground into the surface and thus create the ridge points in the surface. If you now connect this with the eaves points of the ridge and valley line, you get the ridge or valley line surface . This determines the extent of our unfolded roof area.

In order to be able to tear the plumb bobbins , the upper and lower edge of the rafter is cut at eaves level with the plumb line (trimming line or outer edge) of the hip or valley rafter. The top edge of the rafter cuts the bevelling edge on the eaves line. Since points on the eaves = axis of rotation are constant, the plumb line starts above parallel to the ridge or valley line. To create a plumb line below , angle the intersection of the lower edge of the rafters with the profile base (eaves height) on the roof surface (OK rafter) and draw a circle through this point around the eaves point back to the profile base. This gives the lower edge of the rafters at the eaves level . Now you cut the lower edge of the rafters at eaves height with the plumb line in the ground and you have to fold this intersection into the surface at right angles to the axis of rotation. Here, the plumb line starts below parallel to the ridge or valley line surface.

The claws of the purlins, i.e. the cutout with which the purlins saddle up, are determined by cutting the top and bottom edge of the rafters with the top and front edge of the purlins in the profile. The intersection points on the top edge of the rafter ( LO and WO ) are now hit around the eaves point on the profile base and torn into the floor plan. The intersection points at the rafter lower edge ( LU and WU ) must first be angled onto the upper edge of the rafter before turning it around the eaves.
These intersection lines allow a rafter or change to be placed, marked and processed in any position. The eaves = XO and XU is the eaves section, where XO means section on the upper edge of the timber and XU means section on the lower edge of the timber. LO and WO stand for plumb and balance on the top and LU and WU for plumb and balance on the bottom of the rafter. If you connect LO with LU and WO with WU you get sections and claws.
Claw spawning in the area

In order in the surface profile to tear (unfolded roof) Klauenschifter, you have the elevation to the scale bevels of the claws extend.
Ridge Claw Spaulders
This is done by intersecting the "lower edge of the rafters at eaves height" with the "upper and lower edge of the rafters at eaves height". The "upper edge of the rafter at the eaves level" (eaves line) meets the lower edge of the "rafter at the eaves level" on the axis of rotation . Since points on the axis of rotation are constant, this is the starting point for "Scales up". The "lower edge of the rafter at the eaves level" meets the "lower edge of the rafter at the eaves level" and, like the "plumb line below", must be folded from the ground into the surface. This is the starting point for "Scale below".
Throat Claw Spaulders
In the case of throat claws in the surface, the behavior of the ridge claws is the same, except that here, instead of the lower edge of the rafter, the upper edge of the valley rafter is decisive.
Witches cut in the surface spaulders

The witch-cut on sloping rafters is irrelevant in the surface layering. Only on valley planks and canted valley rafters is the use of this name worthy and must be determined as extensively as for the plumbing.
When adding to existing buildings, the valley plank is often a sensible alternative to the valley rafter, as the rafters of the existing area (here HD) do not have to be separated. The fillet plank is tilted on the main roof area and is trimmed for the secondary roof area. The fillet width should be adapted to the (ND) shifters. In order to be able to tear the fillet, you have to fold out the main roof surface, similar to the tilted rafters.

As an alternative to folding down the main roof, the valley pile discharge can be constructed directly over the hatch profile (ND). In this case, the eaves (TP) and ridge points (FP) and threshold and purlins must be extended vertically. With the help of a paper strip as a "lath", TP and FP, Kervenblei and threshold and purlin laces can now be removed vertically from the valley plank in the main roof profile (HD) on the already constructed eaves line in the lobe.
Applications
Anyone who masters the above-mentioned foundation can carry out and tie off almost any roof structure . As preparation for the master craftsman examination is required among other things.

Folding roof with plumb. and skewed shifters

Throat corner with one-sided push-ups

Grate corner with canted central purlin
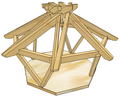
Mandala roof with clad roof surfaces

Walmeck with rising eaves


But of course the foundation is also used in practice.

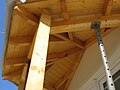
Burr attack from below
Entrance canopy
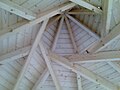
Mandala roof with clad roof surfaces


swell
- Former master Kress, master school in Tübingen
- The current training masters Blumenstein and Volkmann, the Federal College of German Carpentry Kassel
- Carpenter Küppers, master school of the Aachen Chamber of Crafts in Simmerath
- Credit-less comrade (ed.): The new book from the old knowledge of the foundation . Blurbverlag
literature
- Franz Stade (Hrsg.): The school of the construction technician. Course for self-tuition in building construction and the associated auxiliary sciences . Wooden structures. Moritz Schäfer-Verlag, Leipzig 1904.
- Bund Deutscher Zimmermeister (Ed.): Training in the carpenter's trade . Writing according to the area method. Bruderverlag, 1998.
- Bund Deutscher Zimmermeister (ed.): Writing after the surface method. Brother publisher
- Bund Deutscher Zimmermeister (ed.): Writing is not rocket science. Brother publisher
- Robert Seeger (ed.): Foundations, discharges, roof averages. Brother publisher 1931