
screen printing
The screen printing is a printing method wherein the printing ink with a squeegee through a fine mesh fabric is passed printed on the material to be printed. At those points of the fabric where no color should be printed according to the print image, the mesh openings of the fabric are made impermeable to color by a stencil .
In the screen printing process, it is possible to print on many different materials, both flat (foils, sheets, etc.) and shaped (bottles, device housings, etc.). For this purpose, special printing inks are used depending on the material. Mainly paper products, plastics, textiles, ceramics, metal, wood and glass are printed. The print format ranges from a few centimeters to several meters, depending on the application. One advantage of screen printing is that the application of paint can be varied using different mesh fineness, so that thick layers of paint can be achieved. Compared to other printing methods, however, the printing speed is relatively slow. Screen printing is mainly used in advertising and lettering, textile and ceramic printing and for industrial applications.
In addition to letterpress printing , gravure printing and flat printing ( offset printing ), screen printing is also referred to as print through , since the printing areas of the screen printing form are color-permeable. Historically, screen printing is considered the fourth printing process.
Procedure

The printing form of the screen printing consists of a frame that is covered with a fabric. A stencil is applied to the fabric photographically (sometimes by hand in the case of artistic work). The stencil prevents the application of color in those areas of the print image that are not intended to be printed.
The printing form is fastened in a printing machine over the material to be printed (printing substrate). Printing ink is then applied to the fabric and brushed (doctored) onto the printing material through the open areas of the stencil using a rubber squeegee. The color is pressed through the mesh of the fabric and applied to the surface to be printed (of e.g. foils, fabric). After printing, the printed material is removed from the machine and laid out to dry.
History and perspectives of screen printing
In 1851 the world exhibitions began in London, the only major international cultural and trade fairs at that time. In London in 1862, Japanese products first appeared in Europe in the form of katagami stencils. The wonderfully patterned silk goods caused a sensation among laypeople and professionals. The further development to serigraphy took place in America from 1910.
Basically, a distinction must be made between medieval stencil techniques, such as those used in Europe for decorating playing cards, walls, etc. or in Japan for printing textiles, and the development that led to today's screen printing. The Japanese stencil techniques of the 18th and 19th centuries are often presented in the literature as the origin of today's screen printing process, but this has not been proven. The term “ pochoir ”, known in France , does not refer to screen printing stencils, but stencils cut from paper, plastic film or sheet metal. Since the middle of the 19th century, pochoirs have been used for simple coloring of pictures printed in letterpress printing. During the Art Deco era , the pochoir technique experienced its handicraft peak.

In Japanese stencil techniques, the stencils consisted of thick paper made waterproof with vegetable resins. During the cutting process, the individual elements of the templates were fixed to one another by "connecting webs" that were left standing, or "connected" to one another by a network of silk threads. The textile (kimonos, etc.) was printed with the aid of a brush, with which the printing paste was rubbed onto the textile. In the 19th century this technique came to Europe and the USA , where it met with great interest. This fascinating type of Japanese printing art is still carried out today in an artisanal sense. The printing technique is called "katazome" in Japan, the stencils as "katagami".

During the same period, experiments were carried out in Europe and the USA in the field of lettering (sign production) and sometimes in textile printing with a stencil fabric made of silk gauze . There is evidence that such silk gauze stencils were used in the USA at the beginning of the 20th century for printing pennants and signs. One can assume that the technical impulses for today's screen printing did not come from Asia, but from the field of "sign painters" in the USA. A European pioneer of screen printing inks was Hermann Pröll from Germany, who started producing oil-based inks for sign printing around 1926.
Silk gauze was mainly produced in Europe, since 1830 in Switzerland, and later also in France, Germany and Italy. The silk gauze was exported worldwide and in mills for seven of flour used. The Swiss silk gauze manufacturers in particular promoted the early development of the screen printing process in the USA since the late 1910s because the process represented a new market for their gauze.
The method spread at the beginning of the 20th century on the east coast of the USA and in California . In 1908 the Velvetone company was founded in San Francisco . Velvetone was one of the first companies to take over the screen printing process from felt pinnacle printing and to carry out graphic screen printing work (posters and displays) from 1912. The American company Selectasine, founded in San Francisco in 1915, was also important for the development and spread of screen printing. In 1918 Selectasine placed a patent for the production of stencils and "multi-color printing". For a license fee, interested companies could acquire the rights to exercise the "Selectasine procedure". Selectasine has placed its patents in the USA, Europe and Australia. A branch of the company was set up in London around 1923 and the process was spread throughout England. In 1926, the Selectasine process was introduced from England with the help of Swiss silk gauze manufacturers in Zurich. From there, a Selectasine patent was filed in Berlin in 1928.

In Germany, screen printing had been used in the field of sign production and textile printing since the mid-1920s, it was used for advertising prints in the 1930s and then apparently also for lettering on armaments of the Wehrmacht during the Second World War. During the same period, the process spread increasingly in Northern, Southern and Eastern Europe.
Until the Second World War , the screen printing process was developed with great commitment, especially in the USA. Signs, posters, textiles and much more were printed (artistic graphics from around 1937), and during the Second World War also products for the US Army (signs, propaganda posters, etc.). In the mid-1940s, nylon fabric was used for the first time in screen printing instead of silk gauze , which decisively improved the print quality. Further developments in the areas of stencil production, printing inks and mechanical engineering helped the process to achieve a worldwide breakthrough in the post-war period.
The screen printing process is used extremely versatile. Today we distinguish between three important areas of application: graphic screen printing, industrial screen printing and textile printing . There are also other important applications, for example in glass and ceramic printing or in label printing. Although an exact classification is often not possible, some printing examples should be listed here:

- Graphic screen printing: posters , adhesives, displays, traffic and information signs , advertising banners, promotional gifts such as lighters, etc., art prints (serigraphs), print finishing with glossy coatings, decors on CDs and DVDs, crates and beer crates, scratch-off colors on lottery tickets,
- Industrial screen printing: printed circuit boards and electronic circuits, solar cells, stove glass, keyboard foils, rear window heaters, dashboards , coatings illuminated by low voltage,
- Textile printing: T-shirts, sports bags, curtain fabrics, bed linen, clothing textiles, carpets, flags and much more.
Particularly in the area of textile finishing (textile printing), the respective edition often decides on the preferred printing method. Whereas in transfer printing, for example, even small editions of not too complex motifs can be produced comparatively inexpensively, screen printing is always the method of choice for larger editions or complex motifs. So-called "fake" colors, such as colors with glossy or noctilucent effects, can also be reproduced here, as any pigment structure can be applied directly to the textile.
It is extremely difficult to make predictions about the further perspective of the screen printing process in the context of the rapidly developing graphic industry. The latest developments in digital printing make it possible to print many materials (e.g. textiles ) that were previously only screen printed. The high ink layer thickness that can be achieved in screen printing, the resistance of the printing inks and the high flexibility of the process will continue to be advantages of screen printing in the future, both in the graphic and industrial sectors. While graphic screen printing applications are on the decline, the process continues to spread in the industrial sector.
On August 1, 2011, the profession of screen printer ceased to apply. His successor is the media technologist screen printing apprenticeship .
Screen printing mesh

In screen printing, special fabrics are used in different fineness . The advantage of the screen printing process is that the application of paint can be varied depending on the fineness of the fabric and that many different types of color systems (types of paint) can be printed. Fabrics with a low screen fineness result in high ink application (for example in textile printing). However, fine lines or grids cannot be printed with it because the coarse fabric can hardly anchor the fine stencil elements. The reverse is true for fabrics with a high degree of fineness: fine details can be printed. The production of screen printing fabrics is extremely demanding, as the mesh openings of the fabrics must be very uniform. There are only a few manufacturers in the world who specialize in weaving screen printing fabrics.
The following screen mesh materials are used today:
- Polyester fabrics : They basically have a high degree of freedom from warpage, as they can be stretched very strongly and do not absorb moisture. These properties enable a very precisely fitting print result. Polyester fabrics are therefore used for 90% of all screen printing work.
- Nylon fabric (polyamide): They are more stretchable and elastic than polyester fabrics and very resistant to abrasive printing inks. They are used for printing on non-flat substrates or in ceramic printing (abrasive printing pastes). Due to their elasticity and relatively high moisture absorption, polyamide fabrics are not suitable for precisely fitting, large-format printing work.

- Steel mesh : They can be stretched to a high degree , which results in extremely good freedom from distortion and accuracy of fit when printing. In addition, the fabric wires are thinner compared to polyester fabrics with the same mesh fineness. Steel mesh therefore has a larger mesh opening than polyester mesh, which enables a higher amount of paint and, at the same time, the printing of the finest lines. However, steel mesh is very expensive and susceptible to kinking . They are therefore mostly only used in electronic or ceramic printing.
- Screeny: The latest generations of nickel-plated, rustproof, woven steel mesh (Gallus Screeny S-Line) make up for the disadvantages of the steel mesh with its long service life. Screeny is the most frequently used screen printing plate in label printing (rotary screen printing).
- Rotamesh: This is not a fabric, but a plate with very fine honeycomb-like openings. Different hole sizes are available depending on the printing work. Rotamesh plates are shaped into a round cylinder and used in rotary printing machines for printing textiles or for label printing.
- Silk fabrics : They were used in screen printing until the 1950s and then replaced by polyamide and polyester fabrics.
Thread structure

In the textile industry, a distinction is made between fabric threads that can be of “ monofilament ” or “ multifilament ” nature . Monofilament threads are "single-fiber" like wire, i.e. not spun. Multifilament threads, on the other hand, are “multi-fiber”, i.e. spun from several thinner threads. Multifile threads have not been used for fabric production in screen printing since the 1970s, since such fabrics do not offer printing precision and are difficult to clean.
Mesh fineness
The choice of mesh fineness depends on the nature of the substrate, the fineness of the print motif, the size of the color pigments and the desired color application. In screen printing there is no such thing as a “standard fabric” that can be used universally. Fineness is measured either in the unit of threads per centimeter or stitches per inch . The latter unit is mostly used in industrial screen printing and abbreviated with a so-called mesh number .
Most fabric manufacturers offer counts from about 5 threads per centimeter to 200 threads per centimeter. The choice of a suitable mesh count therefore requires a certain amount of experience. The following information can serve as an approximate guideline (the number indicates the number of threads / cm):
- up to approx. 30: printing of glitter etc., relief printing (printing of fine lines or grids not possible).
- 30–60: Textile prints (with opaque direct printing on dark textiles approx. 30–40, with finer lines or grids 50–60). Coarse pigmented colors such as afterglow colors, coarse silver etc.
- 77–90: Opaque prints on paper , plastics etc. with a smooth surface, finely pigmented metallic inks, fluorescent inks.
- 120–140: For fine lines and grids on smooth substrate surfaces with little ink application.
- 150–180: For the finest lines and grids. Reduced color application (UV inks).
Different thread thicknesses with the same mesh count


For most screen printing fabrics, fabrics with different thread thicknesses are available within a certain fineness (for example 120 threads per centimeter). A 120 fabric with thick threads has a higher tear resistance and a slightly lower color consumption than a 120 fabric with thin threads. In contrast, the 120 mesh with thin threads has larger mesh openings, which makes it easier to print fine, sawtooth-free lines or grids. In screen printing, the term "saw tooth" means the disruptive influence of the fabric threads on the printed image. Thin lines can be "interrupted" by the fabric threads, the line appears "jagged" at its edges.
In the past, the thread thicknesses were designated with the abbreviations S (small), T (thick) or HD (heavy-duty). As an an example:
- 120 S denotes a fabric with 120 threads per cm with thin threads, large mesh opening and low fabric thickness.
- 120 T denoted a fabric with 120 threads per cm with medium-thick threads (standard thickness).
- 120 HD denoted a fabric with 120 threads per cm with thick threads, a small mesh opening and a higher fabric thickness.
Due to the increasing use of screen printing in the technical and industrial area, a more precise description of the screen fabric became necessary: The old names S, T and HD were replaced by the specification of the thread thickness in thousandths of a millimeter ( micrometer ). Examples of the new labeling that is common today:
- 120- 31 instead of 120-S
- 120- 34 instead of 120-T
- 120- 40 instead of 120-HD
Examples of possible areas of application:
- Fabrics with thin threads are especially suitable for printing fine lines and grids (thin threads, large mesh size).
- Fabrics with medium-thick threads are suitable for most graphic screen printing work.
- Fabrics with thick threads are more tear and abrasion resistant. They are also used for a reduced application of paint (small mesh size).
Compared to the diameter of a human hair , the threads of a 120 mesh are only about half as thick.
Fabric color


The fabric color has an influence on the print quality of the stencil during screen exposure. During exposure, the light penetrates the copy layer and is reflected on the surface of the thread. In the case of undyed "white" fabric, this can result in an under-radiation of the original (film). Thin lines or raster points become even thinner due to the under-radiation or are no longer shown in the template. If the fabric is colored yellow, only yellow light is reflected into the copy layer. Yellow light does not "harden" the light-sensitive stencil layer. Dyed fabrics enable good reproduction of details. Fabrics with a low sieve fineness (e.g. 30 mesh) are often not colored. The reason for this is that the mesh size is larger than with high screen fineness and is therefore less under-irradiated. The exposure time is also significantly reduced. In addition, hardly the finest motifs are printed with such coarse fabrics.
If both undyed (“white”) and yellow-colored fabrics have to be exposed with the same screen fineness (e.g. 120 threads / cm), the exposure time for undyed fabric should be reduced by about half compared to dyed fabric. Example: dyed fabrics 2 minutes, undyed fabrics one minute.
Screen printing frame

Screen printing frames are made from aluminum, but sometimes also from steel or rarely from wood. They are stretched tightly with the fabric. The tissue tension can be compared to that of a tennis racket. Frames made of wood are only used in the hobby area, since they warp when damp and are not very stable. Aluminum frames have the advantage over steel frames that they are lighter and are rustproof. Steel frames are used when extremely high dimensional stability is required, for example in special industrial screen printing applications with high demands on the freedom of the printed image.
The screen printing frames must be larger than the print image so that there is enough space on all sides of the stencil to print the print image cleanly. The screen frame profiles (frame cross-sections) are dimensioned differently depending on the size of the printing frame and the printing task. The larger the frame, the larger and thicker the frame profile. This is necessary so that the high tension of the screen printing fabric does not deform the screen frame.
A deformation of the screen printing frame causes a tension drop in the fabric and can result in the following printing problems:
- Distortion of the print image and therefore no perfectly fitting print result,
- During the printing process, poor release of the fabric behind the squeegee ("cloud formation" in the color area),
- Register problems in multi-color printing when using printing frames with different fabric tension.
Screen covering

Screen printing fabrics are glued to the frame with high tension (wooden frames can also be covered with staples for hobby purposes). As a rule, the frames are not covered in the screen printing works, as it is time-consuming and requires trained personnel. The supplier industry therefore offers special clamping services as a service .
To cover the frame, the fabric is placed in a tensioning device and clamped on all four sides with clips . The frame is under the fabric. Now the tissue is slowly stretched, evenly in all four directions, until the desired tension is achieved. The fabric tension is measured in Newtons per centimeter along the outer edge of the frame, a polyester fabric of 120 threads / cm is pretensioned with about 18-20 N / cm.
The tensioned fabric is brought into contact with the adhesive surface of the frame. In order to achieve perfect tissue contact, steel weights (steel rods) are placed on the inside of the frame. A quick-hardening two-component adhesive is then spread through the fabric onto the frame with a brush . The adhesive diffuses through the open fabric mesh and bonds the fabric to the print frame.
After the adhesive has cured within 30 minutes, the fabric is firmly and insoluble glued to the frame. Now the tensioning clamps can be loosened and the covered frame can be removed from the tensioning device. Any excess tissue that is on the outside of the frame edges is cut away with a knife. The covered frame needs a rest period of around 24 hours, as there is inevitably a slight drop in tension in the fabric. The frame can then be used for a precisely fitting print.
Sieve preparation (tissue cleaning and degreasing)

Screen preparation is the process of removing stencils that are no longer required from the screen printing fabric ("stripping"), cleaning the fabric from paint residues and degreasing the fabric. Degreasing is important so that newly manufactured stencils adhere properly to the fabric.

Stencils that are no longer required can be removed from the fabric with special liquid "strippers". Before doing this, however, the stencil must be cleaned of any paint residues so that the decoating liquid can properly wet the stencil layer. After applying the stripper and allowing it to take effect for a short time, the stencil begins to dissolve. The stencil remains can now be removed from the tissue with a sharp water jet (high pressure device). To clean the fabric from paint residues, the screen printing trade offers special "fabric regenerators" or solvents that do not pollute waste water (environmental protection).
Before the new stencils are made, the fabric must be degreased so that the stencil adheres properly. Here are oily residues or fats (fingerprints, etc.) removed from the fabric. To do this, a surfactant-containing degreaser is applied to the fabric with a brush or sponge and rinsed off with water after a short exposure time. Household cleaning agents, such as dishwashing detergents, must not be used as they contain lipid-replenishing oils or silicone-containing defoamers, which can impair the adhesion of the stencil.
The degreased sieve is dried in a drying oven at about 30 to 40 ° C. Removing the water with a vacuum cleaner leads to a significant reduction in the drying time of the screen and a lower level of humidity in the drying oven . In the case of newly coated screens that are in the drying oven, high air humidity could impair the subsequent stencil production, as the exposure time would have to be increased in an unpredictable manner.
Manual (artistic) printing form production


Today, screen printing stencils are almost exclusively made by photographic means. Nevertheless, the possibilities for the manual production of screen printing stencils should be briefly discussed here. These techniques are sometimes used in school lessons or in artistic work. Historically, in the first half of the 20th century - in the early days of the screen printing process - these techniques were mainly used in commercial screen printing.
With manual printing form production, the print motif is applied to the fabric by hand. This can be done by painting the motif on the fabric or by sticking cut papers or special cutting films on the underside of the fabric. Compared to photographic stencils, the time required for manual stencil production is often greater, but above all certain restrictions in terms of reproduction fineness and print quality have to be accepted. Nevertheless, experimenting with manual stencil techniques can be very exciting and the print result can be surprisingly beautiful. The following techniques can be distinguished:
- Cover template
- Here the motif is painted (covered) into the fabric with a brush. To do this, a drawing of the motif (contours) is first made on a sheet of paper. It is important to ensure that too fine details later cause difficulties when drawing on. The drawing is now placed under the sieve and the motif of the drawing is painted into the tissue using a sieve filler (liquid that clogs the meshes of the fabric). The screen should be a few millimeters away from the drawing so that it cannot stick to the screen filler. All areas of the fabric that should not be printed are covered, the meshes of the fabric remain open in the printed image.
- Washout template
- Here the motif is drawn directly into the fabric with soft chalk. The fat chalk has to clog the meshes of the fabric. Then a thin (!) Layer of water-soluble screen filler is applied to the entire fabric with a spatula. After the screen filler has dried, the grease chalk can be washed out of the fabric with a solvent such as nitro thinner. The drawn print image can now be printed. With a little practice, lithography-like effects can be achieved with this technique. Sieve finenesses of 90–120 threads / cm are suitable for this.
- Paper template
- This is certainly the easiest of all stencil options in screen printing. Here the motif is cut or torn into thin paper. This "silhouette" is placed in contact under the sieve. Now thick paint is applied to the screen and printed. Because of the thick paint, the paper sticks to the screen. For this purpose, fabrics with low finenesses should be used, for example 40–70 threads / cm.
- Cutting template
- It is comparable to the "paper template", but here the motif is cut into special cutting films available from specialist shops. They consist of a transparent plastic film on which the stencil layer is located. The motif is cut into the layer without cutting through the carrier film. Then those parts that are to be printed later are detached from the carrier film. Now the cutting film is placed in contact under the sieve. From the top of the screen, the film and fabric are glued together with a cloth soaked in a suitable solvent. After the stencil has dried, the carrier film is removed. Water transferable or solvent transferable films are available.
- Reduction template
- Here only a single screen is required to print a multi-colored motif. The stencil is increasingly covered according to the motif after each printing sequence. First the color with the largest area is printed, and finally the color with the smallest area. This sophisticated technique was patented in the USA in 1918; the first patent for today's screen printing ("Selectasine process"). A comparable technique is known in wood and linocut under the names " elimination technique ", "lost plate" or "reduction woodcut" and was used by Pablo Picasso .
Photomechanical printing form production
Compared to the other printing processes, the possibilities for the production of printing plates in screen printing are very diverse. On the one hand, there are many different types of mesh. On the other hand, there is now the choice between two (or actually three) different techniques for making stencils. Within these techniques there are, in turn, several possibilities for influencing the printing result in the stencil production. In addition, it should also be taken into account that the stencil must be resistant to the printing ink.
Especially newcomers to screen printing are often a little irritated at first because of the many fine meshes, chemicals, stencil materials and printing inks. Despite this variety of chemical-technical products for stencil production, the basic context is relatively easy to understand.
Overview of the photomechanical screen printing stencils

In screen printing, there are basically two different types of stencil production, each of which has its advantages and disadvantages:
- The direct method (direct template)
- The indirect method (indirect template)
With the direct stencil, the fabric is coated with a light-sensitive layer, exposed and developed. The stencil is therefore produced directly on the fabric (hence the name "direct stencil "). There are two ways of coating the screen: by applying a liquid copy layer on both sides of the fabric or by transferring a film coated with a copy layer onto the fabric (direct film). In the case of the indirect stencil, the light-sensitive layer is located on a transparent plastic film, as in the case of direct films. The indirect film is only transferred to the fabric after exposure and development (hence the name "indirect").
- Advantages and disadvantages of direct stencil with liquid layer
- It is inexpensive and has a very good anchorage in the tissue (printing of very high editions with good print quality). However, the layer contains 50-60% water, which leads to a corresponding loss of the coating when it dries. This shrinkage causes a certain roughness of the stencil surface . Since a stencil should be as smooth as possible on its underside (substrate side), this shrinkage can, in extreme cases, lead to a slight outflow of the printing ink on the stencil edges - especially if the printing ink is relatively thin.
- Advantages and disadvantages of the indirect stencil
- The stencil has an extremely smooth surface (substrate side) and is ideal for printing the finest grids and lines. However, the stencil adhesion is comparatively low - indirect stencils are not suitable for long print runs. They are also sensitive to moisture (not suitable for water colors). Expensive.
Attempts to combine the resistance of the direct stencil with liquid layer with the print quality of the indirect stencil led to the development of direct films in the early 1980s. Such templates are therefore colloquially referred to as "combination templates". Direct films are mostly transferred to the underside of the printing form with water, sometimes with the help of a liquid layer.
- Advantages and disadvantages of direct films
- The stencil has a very smooth surface (substrate side) and is very suitable for printing the finest grids and lines. In contrast to indirect films, the stencil adhesion with direct films is good (suitable for printing long runs). Direct films are offered in various thicknesses, the layer thickness is defined (in thousandths of a millimeter). Water resistant films are available. Like indirect films, direct films are expensive. The transfer to the tissue takes some practice.
The global market shares of the various possible stencil technologies (graphic and industrial screen printing, textile printing) are roughly as follows: Indirect stencil with liquid layer ("copy layer") approx. 90 percent. The remaining 10 percent share is divided between direct films and indirect films, with direct films having the larger share.
Direct stencil - the different copy layer systems

There are several product groups available for both liquid layers and direct films, which differ primarily in terms of their resistance to water and solvent inks, but also in terms of exposure time and the ability to decoat. Liquid layers must also be made photosensitive in some cases with a sensitizer before use. The sensitizer is supplied with the purchase of a copy layer and is then stirred into it. There are also copier layers available that are already light-sensitive (“presensitized”). Direct films are always available in a light-sensitive state, in sheets or from a roll. For the newcomer , a copy layer is recommended that is presensitized, solvent and water resistant and, above all, easy to decoat.
- Diazo-sensitized copier layers
- Diazo is a sensitizer that has been used as a replacement for the bichromates used until then since the 1970s. In contrast to the bichromates, diazo layers hardly pollute the wastewater. Diazo layers are comparatively inexpensive and have a large exposure latitude. Diazo layers are available that are suitable for printing with solvent inks, other diazo layers are especially suitable for printing with water colors (textile printing). However, water-resistant diazo layers are sometimes difficult to decoat.
- Photopolymer-sensitized copier layers
- These copier layers were developed in Japan at the beginning of the 1980s; they have a very short exposure time, but in some cases a small exposure latitude and therefore require a precisely adjusted exposure time. Polymer layers are mainly used where a short exposure time is required, for example with thick layers of the stencil or with projection or laser exposure. Photopolymer layers are always available presensitized.
- Diazo polymer sensitized copier layers
- Diazo polymer layers combine the advantages of the diazo layers with those of the photopolymer layers. Diazo polymer layers have a good exposure latitude with a short exposure time. In addition, these copying layers are often both water and solvent resistant and easy to decoat. Because of these good properties, diazo polymer layers have found widespread use in screen printing.
- Direct films
- Direct films consist of a thin polyester carrier onto which a liquid layer has been mechanically poured. In a light-sensitive state, direct films are available from specialist retailers as rolls or sheets. In the same way as the copying layers, diazo films, photopolymer films or diazo polymer films are available.
- Direct films have a precisely defined layer thickness. The layer thickness is specified by the manufacturers in µm (thousandths of a millimeter). The layer thicknesses can be 15 µm, 20 µm, 25 µm, 30 µm, 40 µm etc. up to a thickness of 200 to 400 µm. In principle, thin direct films are used for fabrics with high fineness, and correspondingly thicker direct films for fabrics with low fineness.
- Direct film 15 µm: For mesh counts 150–180 threads / cm
- Direct film 20 µm: For mesh counts of 120–150 threads / cm
- Direct film 25 µm: For mesh counts of 90–120 threads / cm
- Direct films 30–50 µm: For mesh counts 40–80 threads / cm
Indirect stencil (indirect films)

These films consist of a polyester film (carrier film) coated with a light-sensitive gelatin layer. They are transferred to the underside of the screen after exposure, chemical post-curing with hydrogen peroxide and washing out (developing) of the print image. After the film has dried, the polyester film is removed. The indirect stencil only adheres to the underside of the fabric, it can anchor itself comparatively slightly in the fabric, which is why one often speaks of an "on-fabric stencil" here. Stencils that are applied on both sides of the fabric with a liquid copy layer as described above, adhere much better to the fabric ("in-fabric stencil"). In spite of the low anchoring in the fabric and the resulting limited print run, indirect stencils are used for special work (especially when printing fine grids) because the quality of the print result is very high.
Indirect films are also available that no longer have to be chemically post-cured after exposure. Indirect stencils are very thin and are only suitable for mesh counts from 77–90 threads / cm and higher. Indirect stencils are not suitable for printing with water-thinnable screen printing inks.
Coating techniques
Basic terms that are important when making stencils:
- Print side (substrate side) is the side of the fabric that faces the print material and touches it during printing (underside of the printing form)
- Squeegee side is the inside of the screen frame, on which the printing ink is applied and doctored ( upper side of the printing form)
- Coating channel is used to receive the copy layer and for the uniform application of the copy layer
When making the stencil (coating with a liquid layer or film transfer), it is important to work carefully. Errors in the stencil production can hardly be corrected later in the print, they have a direct effect on the print result.
Manual coating
- Wet-on-wet coating
- The screen is coated thinly and evenly on both sides with the liquid copying layer. For this purpose, the copying layer is filled into a coating channel. The sieve is fastened vertically in a holder (or leaned against a wall at an angle). The coating channel is now placed on the screen mesh below with light pressure. Now the coating channel is pulled slowly and evenly in this tilted position, sliding upwards over the screen mesh. The screen mesh is filled with the copy layer. The printing side (substrate side) of the screen printing fabric is always coated first, then the squeegee side.This second coating process on the squeegee side can be repeated several times, depending on the desired layer thickness of the coating. The counting of the different coating sequences is then, for example, 1: 1, 1: 2, or 1: 3 (in each case in the order print side: squeegee side).


- The aim is to achieve a smooth stencil surface on the underside of the screen (pressure side), which is able to balance the structure of the fabric. This fabric structure compensation is important so that the printing ink cannot flow under the stencil edge during printing. So that a good stencil edge can form, the stencil should be about 15 to 20 percent thicker than the fabric. Both the surface smoothness and the layer thickness of the stencil can be precisely determined with special measuring devices, but very few screen printing companies have such expensive measuring devices. The right coating technique is primarily dependent on the mesh fineness, the copying layer used and the coating channel and is therefore a matter of experience.
- Drying
- Now the coated printing screen is placed with the printing side down in a drying cabinet and dried at 30 to 40 ° C. It is important that the screen is placed in the drying device with the print side down so that the layer structure that was achieved by the coating sequences remains on the underside of the screen. If the printing screen were placed in the drying cabinet the other way around, i.e. with the printing side up, the still liquid copy layer would flow through the mesh openings of the fabric towards the squeegee side. If the drying cabinet is well ventilated, the screen will dry in about a quarter of an hour to an hour, depending on the thickness of the coating and the mesh size, and can then be exposed. When dry, the coated printing screens are sensitive to light and must be protected from strong light (direct sunlight, copy lamp). Ideally, the coated screens should be processed in yellow room light. A longer storage of the screens before exposure may only take place in a dark room or a cupboard.
- Recoating
- After the coated screen has dried, the surface smoothness of the coating can - if necessary - be improved by a further coating on the printing side (recoating). The layer thickness of the stencil is increased slightly. If several subsequent coatings are carried out, the screen must be dried again after each subsequent coating process, which significantly increases the production time of the stencil. Today, however, copy layers are of good quality, so that after-coating is hardly necessary, especially with high mesh fineness. In the case of deep screen fineness, recoating can be useful for “sawtooth-free” printing. The sawtooth effect describes "jagged" stencil edges, caused by the insufficient balance of the screen mesh structure.
Machine coating
Coating machines automatically apply the copy layer to the fabric from both sides. The process is the same as coating by hand. However, very even coating results can be achieved with coating machines, especially with large-format printing screens. All important parameters such as the coating speed, the contact pressure of the coating channel, the number of coating sequences, etc. can be set. Often the printing screen is dried by infrared heating immediately after coating . The machine coating guarantees a reproducible, exact coating result and thus also a reproducible printing result.
Transmission of direct films
- Transfer of the film with water (capillary method)
- Direct films are applied to the wet screen mesh. Before the film is transferred, the screen is evenly wetted with water. The wet sieve is often treated with a wetting agent that reduces the surface tension of the water film. This creates an even, stable film of water on the surface of the fabric, which makes it easier to transfer the direct film.

- The film, cut to the desired format, is transferred to the fabric by unrolling. In doing so, the film immediately bonds evenly in the screen printing fabric. The excess water on the squeegee side is wiped off with a rubber flap. The sieve frame is then dried with a leather rag so that drops of water cannot drip onto the layer. After drying, the backing sheet of the film can be peeled off the layer and the screen can be exposed.
- Direct film stencils have a very high surface smoothness on the printing side of the screen, which results in a high-quality print. However, they are significantly more expensive than coating with a copy layer. The resistance of the printing screen with long print runs is usually somewhat lower than with stencils with a copy layer.
- Transfer of the film with a copy layer ("combination method")
- With this method, the film is transferred to the dry tissue with a liquid layer. For this purpose, the film is brought into contact with the fabric on the pressure side of the screen. A coating channel is used to apply a liquid layer to the fabric from the squeegee side. The liquid copy layer combines with the layer of the direct film. A "sandwich" is created in which the screen mesh is embedded. As a rule, these coatings are carried out automatically in a coating machine.
- After the layer has dried, the film backing is removed and the screen is exposed to light. Liquid layer and direct film must have the same exposure time, so only products recommended by the manufacturer should be used. This method of film transfer is rarely used because the risk of dust inclusions is greater when transferring the film than when transferring the film with water (capillary method). However, the stencil's resistance to printing is very high - it corresponds to a stencil with a copy layer.
exposure
Light sources
A strong light source with a high UV component is used for exposure . Today so-called metal halide lamps with an output of 3000 to 6000 watts are used for this purpose . The exposure time depends on the mesh fineness, the copy layer used and the thickness of the coating. The deeper the tissue fineness (the thicker the layer thickness), the longer the exposure must be. In the hobby area, one can also try to expose the coated screen with a photo spotlight or a mercury vapor lamp , but diazo copying layers should be used for this, as photo polymer layers require stronger UV light.
UV LEDs are also used today. The advantage here is that the film and screen stencil are not exposed to any thermal stress. In addition, overexposure to radiation is avoided (MLP Multi LED precision process) and significantly less energy is used.
Master copy (film)
A transparent film is required as a master copy, on which the image motif is reproduced with very good coverage (opaque blackening). The image must be the right way round (not mirror-inverted ) and positive . The film may only have transparent and black image areas, so no half-covering " gray levels ". The films are produced in printing or repro companies. Foils that are printed out with a laser printer or photocopier are suitable for the hobby area or for motifs that have no subtleties (only texts, surfaces), in some cases even two identical foils must be glued congruently on top of one another so that good opacity is achieved.
Exposure process
Before exposure, the film is placed on the print side of the coated screen. The layer of the film must be in contact with the layer side of the screen (“layer on layer”) so that fine details cannot be undermined. The screen is now placed in a special copier (exposure device), which uses a vacuum to press the screen with the film firmly onto a pane of glass. The screen is now exposed through the glass pane. The exposure makes the copy layer waterproof - those areas of the copy layer that are protected from light by the covering film, on the other hand, remain water-soluble. After exposure, the screen is wetted on both sides with a hand shower and lukewarm water and the printed image is washed out. All unexposed areas of the copy layer are washed free. The washing can also be done with a high pressure device, but with a not too strong water jet. The water is removed from the screen surface with a water suction device and the screen is dried. After drying, conspicuous flaws in the sieve are retouched with a "sieve filler".
To determine the correct exposure time for the first time, a step exposure should be made with a "test sieve". Different exposure times (levels) on the “test screen” can be used to determine which is the optimal exposure time.
Projection exposure
The screen copy with an exposed film is also known as a “contact copy”, since the film is pressed against the light-sensitive coated screen in the copier using a vacuum. Screen printing companies, which often print in large format, try to exclude the film costs as much as possible, because these represent a not inconsiderable share of the costs for such printing work. Projection exposure is a tried and tested option. With this "contactless" screen exposure, a small film (approx. DIN A3 ) is enlarged in a projection camera onto the light-sensitive coated screen. The process can be compared to projecting vacation photos onto a screen. However, in screen printing, a projection camera with its extremely high-quality optics and mechanics is a financial investment that only pays off when large-format prints are often to be made. A special UV lamp serves as the light source; the exposure time takes a few minutes. In order to avoid a long exposure time, the coating of the screen should be as thin as possible.
Digital stencil illustration - Computer to Screen (CTS)

While with the projection exposure from a small-format film an enlargement is projected onto the screen, with the computer-to-screen method no film is required. Starting with digital data, the print image is sprayed (ink-jet) or exposed (laser) directly onto the light-sensitive coated screen with ink-jet imaging or laser exposure. In the ink-jet process , the motif is sprayed onto the stencil layer with UV-impermeable ink or liquid wax. After the imaging, the screen is exposed to a copier lamp and then the printed image is washed out. With DLP laser technology (English: Direct Light Processing ), on the other hand, the motif is exposed directly into the light-sensitive layer. In contrast to projection exposure, CTS processes require a longer time to produce the stencil (writing speed in dpi). However, finer raster images can be reproduced here than would be possible when projecting. In contrast to projection, the technology is also suitable for thick coatings on low screen finenesses.
The laser exposure with UV laser (LDS = LaserDirectSreen) is used for small stencils. The writing widths are currently 130 mm or 380 mm. The length is variable. 60 grids are possible without any problems. Mainly used for CD / DVD and cartridge printing. The exposure time is strongly dependent on the emulsion. Theoretically, all coatings can be used, but it is recommended to expose CTS coatings (faster and no overexposure). The digital stencil exposure also offers the possibility of using frequency-modulated screens (FM) in screen printing.
Printing equipment, printing process
Squeegees


The squeegee in screen printing consists of a rubber ( elastomer ) that is clamped in a holder. During printing, the squeegee creates contact between the screen and the printing material. The printing ink is transferred from the mesh openings onto the printing material. The squeegee rubber consists of the elastic, relatively solvent-resistant and abrasion-resistant plastic polyurethane.
The hardness (elasticity) of the squeegee has an influence on the print result. Softer squeegee rubbers are better suited for area prints, glaze colors or textile prints, harder squeegee rubbers are better suited for halftone prints or negative prints. Three degrees of hardness are available: soft, medium-hard and hard. The degree of hardness is given in " Shore " (the Shore A scale describes the hardness of elastomers: 0 = very soft, 100 = very hard). A soft screen printing squeegee has about 65 Shore, a medium-hard squeegee about 75 Shore and a hard squeegee about 85 Shore. Medium-hard squeegees are mostly used in screen printing.
When printing long runs with solvent or UV inks, the squeegee can deform over time - it swells up and sags, which deteriorates the print quality. For this reason, special squeegees are offered that are more dimensionally stable for long runs. A squeegee is offered under the brand name “RKS”, which consists of a solvent-resistant, dimensionally stable plastic strip to which an approx. 1 cm wide rubber is stuck. Other manufacturers offer multi-layered rubber squeegees that have a hard, dimensionally stable “core” and two softer outer sides (“sandwich construction”).
When printing by hand, squeegees are mostly used, in which the rubber is connected to a wooden handle. With these hand squeegees, the printing ink is spread over the screen and then printed. When printing on machines, two squeegees are required: a pre-squeegee and the actual squeegee. The pre-squeegee is a sheet of metal that distributes (floods) the printing ink evenly over the printing screen before printing and thereby fills the mesh openings of the stencil with ink.
Printing machines

The ready-to-print screen is attached to the printing machine. This can be a hand-held printing device, a semi-automatic , three-quarter automatic or fully automatic screen printing machine :
- Hand printing table
- The insertion of the sheets into the printing device, the printing and the removal of the prints are carried out by hand. Hand printing tables are used for short runs or for special jobs .
- Semi-automatic printing machine
- The sheets are inserted into the printer by hand, the printing is done automatically and the prints are removed by hand. The printing speed is around 300 to 600 prints per hour, depending on the print format.
- Three-quarter automatic printing machine
- The sheets are inserted into the printing device by hand, whereas the printing and placing of the prints on the conveyor belt of a continuous dryer are automatic. The printing speed is around 600 to 1000 prints per hour, depending on the print format.
- Fully automatic printing machine
- The sheets are inserted, printed, the prints placed on the conveyor belt of a continuous dryer and stacked are all carried out automatically. The printing speed is around 1000 to 3000 prints per hour, depending on the print format.
Screen printing machines can be designed in such a way that the screen opens like a hinge after the printing process (opening angle) or lifts off parallel to the printed sheet (opening parallel). Fully automatic machines are partly built according to the cylinder pressure principle . Here the screen is located above an impression cylinder. During the printing process, the screen moves forward while the squeegee presses on the apex of the impression cylinder. The cylinder rotates synchronously with the forward movement of the screen. Cylinder printing machines have a high printing speed, but can only print on flexible materials.
Printing process


Now the printing squeegee and the pre-squeegee (flood squeegee) (in the adjacent figure: B) are installed in the printing machine. Then the printing ink (A) is placed on the screen (D) and the ink is evenly distributed (flooded) over the entire screen with the pre-doctor blade. The printing material (printing sheet) (F) is located under the screen. The printed sheets must always be in exactly the same position under the screen so that the colors match each other perfectly when working with multiple colors. This is done by means of pins built into the printing plate or by markers made of self-adhesive film that are glued to the printing plate. Now the printed sheet is applied to the marks and then the color is transferred to the sheet (F) through the open screen positions (C) with the help of the printing squeegee. During the printing process, the printed sheets are fixed on the printing table with a vacuum so that they do not shift or stick to the screen.
Printing problems
Depending on the nature of the substrate, the fabric tension, the ink thinning, the squeegee grinding and squeegee printing, etc., various printing problems can arise. Too little jump (distance between fabric and substrate) can lead to "cloud formation" in the print, for example, as the fabric behind the squeegee cannot immediately detach from the printed ink film - it remains "stuck" in the printed ink. Too much jump, however, increases the fabric tension, which can lead to unclean printing of the stencil edges. Printing ink that is too thin tends to "smear" (the ink flows out of the stencil edges), whereas too thick printing ink tends to cause poor ink transfer to the substrate. Excessive squeegee pressure also causes “smearing” of the print image, the same applies to a squeegee that is too round and unsanded.
Screen printing
As with the other printing processes, screen printing can also be used to print raster images. However, some process-typical peculiarities have to be observed in screen printing so that a perfect print result can be achieved. In screen printing, for example, it is not possible to print a “standard screen fineness” because the choice of a suitable screen fineness depends on several questions, for example:
- Which material should be printed on (textiles, smooth surfaces, etc.)?
- Which sieve fineness is used (a fabric with 60 threads / cm or a fabric with 120 threads / cm)?
- How big is the print image?
Normally, colored original images are broken down into the printing colors cyan, magenta, yellow and black, screened and then printed on top of one another in a translucent manner ( color separation , four-color printing , printing screen ). In some cases, however, it is not necessary in screen printing to separate and rasterize a print job. Example: An orange text is to be printed in one color. Here it makes no sense to form the orange in two colors by overprinting a light rastered magenta and yellow, since in screen printing the orange can easily be mixed as a special color and printed in one color. If you have any questions, it makes sense to contact the printer.
Types of raster, dot shapes


A basic distinction is made between amplitude-modulated and frequency-modulated screens ( AM and FM screens ). With the AM raster, the raster points are strictly geometrically arranged - they always have the same distance from one another. The raster points are small in light areas of the image, and correspondingly larger in darker areas of the image.
With the FM raster, the points are arranged randomly to one another (like scattered grains of sand), but always the same size. There are fewer points in light areas of the image, and correspondingly more in darker areas of the image.
In the worst case, the geometrically arranged AM grid can result in a moiré with the screen printing fabric, since the fabric itself represents a "grid". Moirés are mostly wavy, disruptive patterns that can arise when two grids are superimposed. With the randomly arranged FM grid, there should be no problems in this regard (unless the FM points are square and have an unfavorable relationship to the size of the mesh openings of the fabric). The AM screen is mostly used in screen printing because it has a calm image effect.
With the AM raster, different point shapes can be selected: square, round or elliptical points. The elliptical dot shape should be selected for screen printing, since image gradients from light to dark are more beautifully reproduced in the print than, for example, with square-shaped dots.
Screen ruling (screen ruling)
The term “ grid width ” describes the number of grid points per centimeter. As mentioned at the beginning of this section, the screen ruling in screen printing depends on the fineness of the screen printing fabric used in the print. In the case of a tissue with a low fineness, the grid points must be large enough so that they can be properly anchored in the tissue. When printing with high mesh fineness, it is possible to use correspondingly finer screens. With a mesh count of 30 to 60 threads / cm, a grid width of 10 to 15 points / cm should make sense. For fabrics with 120 threads / cm or finer, screens of up to 48 dots / cm can be printed. It should be noted that lower screen finenesses in screen printing can be printed much more easily than high screen finenesses ( tone value increase ). High screen finenesses such as those used in offset printing can hardly be printed in the same quality in screen printing. The choice of a suitable screen fineness should be clarified in cooperation with the printer.
Screen printing inks
Screen printing inks for commercial and industrial applications
Many types of color are available for screen printing. They differ primarily in their adhesion properties and resistance to different materials (substrates such as paper, plastics, textiles , metals , glass, etc.) and in their drying behavior. A basic distinction is made between physically and chemically reactive drying screen printing inks. In the case of physically drying inks, a solvent evaporates from the printed ink film, while in the case of chemically reactive inks - as the name suggests - drying (better: "hardening") is achieved through a chemical reaction .
- Solvent inks (physically drying)
- As the solvent contained in the paint evaporates, these paints dry out to form a solid paint film. Most solvent inks contain organic solvents (but water-thinnable screen printing inks are also available). The disadvantage of solvent based paints is the pollution of the room air by the solvent evaporating from the paint. Depending on the type of ink, solvent inks are often used for printing on paper and cardboard and for various plastics. Some water-thinnable paints are also offered for this purpose, but these have not been widely used. Water-thinnable inks, on the other hand, are often used in textile printing or in art prints (serigraphs) or in school lessons.
- Solvent inks are usually not ready for printing, which means they have to be diluted with a suitable solvent before printing. The paint manufacturers offer special "thinners" for each type of paint. Slowly evaporating "retarders" are also available so that the ink does not dry up in the screen openings and clog them when printing fine lines etc. It takes a certain amount of experience to get the color ready for printing with a suitable amount of thinner or retarder. Inks that are too thinned out do not produce a sharp-edged print, they tend to “smear”, whereas inks that are too thick are too “sticky” and also worsen the printing behavior.
- Chemically reactive drying inks
- Two-component paints: These cure by adding a catalyst ("hardener") to a solid paint film with excellent resistance. The curing time takes several hours to days. Two-component inks are used for printing on metals (e.g. aluminum signs), glass, synthetic textiles, etc. Synthetic resin paints dry by absorbing atmospheric oxygen (comparable to artist oil paints). The curing time takes several hours to days. Synthetic resin paints are high-gloss and adhere perfectly to glass and metal. UV inks do not contain any evaporating solvents. They cure by the irradiation in seconds to form a solid paint film with strong ultraviolet light. It is also very much appreciated that UV inks do not dry up in the mesh openings of the stencil during printing. Suitable UV inks adhere to many plastics, paper, glass, metal, etc. Due to these properties, UV inks are often an alternative to solvent inks.
- ... and many special colors
- The application possibilities of screen printing are very large, therefore the ink manufacturers offer suitable printing inks for every special printing job.
- In textile printing are often plastisol used colors. They contain PVC powder and a liquid plasticizer . At higher temperatures of around 170 ° C, the PVC powder absorbs the plasticizer and the color gels . Plastisol inks often have good opacity on dark textiles and cannot dry out in the mesh openings of the stencil when printing. Special enamel inks are suitable for printing on glass and ceramics. They bond permanently to the substrate after baking at 600 to 1200 ° C. Ceramic gold or silver colors contain precious metals (gold, platinum). In the food industry, screen printing is used to decorate sweets (pralines, marzipan, etc.), to top rolls with butter, chocolate or jam, or to decorate pies and cakes with icing decorations. Other special colors are: scented colors, pearlescent inks, thermochromic inks (change their hue when heated ), adhesives, printable protective films, mica, electrically conductive printing pastes, scratch-off inks (for competition cards), fluorescent, phosphorescent and self-luminous inks, relief varnishes (for braille or decorative effects) , Metallic inks with a mirror-like sheen, etc. On banknotes, optically variable inks can be found which, when finished, have a different color depending on the viewing angle.
Screen printing inks for school and artistic applications


Screen printing is often used in school lessons when the techniques of the various printing processes are taught. Especially when printing with children, adolescents or students, the problem arises that the vapors of solvent-based screen printing inks that are used in trade require a certain amount of getting used to and are sometimes perceived as unpleasant by the class participants. In addition, schools often do not have the ventilation devices required and installed in commercial screen printing plants.
Water-thinnable screen printing inks are an alternative to solvent-based inks. They have no unpleasant odors and the sieves can be cleaned easily with water. There are two types of water-thinnable screen printing inks available: acrylic and gouache . Acrylic paints often have the problem that they can hardly be removed from the clogged screen with water when they dry in the screen (a possible problem during printing). Gouache colors behave more easily in this regard. The fundamental problem with all water colors, however, is that paper begins to curl after printing. Only thicker or specially coated papers or cardboard can be printed.
Serigraphy (screen printing and art graphics)

The term "serigraphy" describes the printing of art graphics using screen printing. Serigraphs are made by the artist himself or in close collaboration with a screen printing company.
After the First World War , screen printing was increasingly used in the USA for printing signs, posters or displays . In some cases, such works were very elaborate, with a high number of colors and careful design. The term “commercial art” was used here, which would be called “commercial art” today. For example, multicolored calendar images are known, which have apparently been printed in large numbers since the 1920s. Such early graphic screen-printing works are not to be regarded as art graphics, but as "upscale, popular commercial graphics". In Europe, several such works were designed by the painter Hans Caspar Ulrich from 1927 and printed in his Serico company in Zurich.
Between 1923 and 1930, Gilbert Tonge printed replicas of paintings in Los Angeles in close collaboration with the artists. These were works by the Californian impressionists Sayre, Lauritz, Payne, Stirling and Gleason. The paintings were reproduced in gouache in around 30 colors and in oil in up to 50 colors in order to preserve the original character of the works of art. These printing works were printed in large editions for screen printing and offered for sale through advertising. Around 1933, screen printing technology was partially taught at art schools in the USA. Here, too, the direct implementation of artistic ideas in the screen printing process was not sought, but poster graphics ("Commercial Art") were printed.
During the Great Depression of the 1930s, the American government tried to secure their livelihood for US cultural workers (painters, sculptors, writers, photographers, etc.) through government contracts as part of the WPA ( Works Progress Administration ). This also included the “Federal Art Project” and its “Graphic Division” founded around 1935. There, the printing of art graphics (in lithography , woodcut, etc.) and poster printing (partly in screen printing) was promoted. The New York artist Anthony Velonis was one of the first to adopt the inexpensive and relatively easy-to-use screen printing process from poster printing to the field of art graphics. In 1938, Velonis published two technical guides on using screen printing to print fine art graphics. In the same year Velonis and six artists from the Federal Art Project founded the "Silk Screen Unit", which dealt with the implementation of the screen printing process for artistic applications. In order to distinguish it from commercial screen printing (silk screen, screen printing), the term "serigraphy" was introduced around 1940 for artistic screen printing.

Around 1949, American silkscreen prints and serigraphs were exhibited for the first time in Germany in the “America Houses” in the US zone, which evidently met with great interest. The process has now also been adopted by German artists. In particular Max Ackermann , Willi Baumeister , Rupprecht Geiger and Fritz Winter discovered the new artistic medium for themselves and contributed to its further spread - together with printers willing to experiment such as Luitpold Domberger , Hans-Peter Haas and Roland Geiger .
From the 1950s, the screen printing process was then used in many art directions for printing graphics, for example by artists who are assigned to optical art (e.g. Victor Vasarely ), as well as by representatives of Pop Art ( Roy Lichtenstein , Andy Warhol , Tom Wesselmann , Eduardo Paolozzi , Joe Tilson , Peter Phillips and others). In the field of concrete art, too, with its most important representatives such as Max Bill , Richard Paul Lohse or Anton Stankowski , the process of producing prints was preferred. One of the best-known representatives of serigraphy in animal painting is the American Anne Senechal Faust , who manages with few stencils to achieve a characteristic 3D effect.
There was never a procedural separation between commercial-industrial and artistic application in screen printing. In relief, gravure and flat printing, on the other hand, industrial and artistic applications differ significantly in terms of their printing technology. As a result, screen printing in the art trade was often regarded as a "second-class" printing technique for a long time. For example, screen-printed reproductions in four-color raster printing were often sold as "serigraphs". In order to meet the requirements of a screen-printed original graphic, the request was made that the artist should transfer the motif by hand (or with cutting film) directly onto the screen. However, this requirement makes little sense, as this would severely restrict the artistic possibilities technically. In addition, if the fabric were damaged, the preliminary artistic work would be useless, and the sieve would have to be rebuilt with a corresponding expenditure of time.
When printing serigraphs, the artist should pay attention to the following aspects: The motif can be drawn directly on the screen, but also on a transparent film or exposed onto films from computer data (the films or films are then photocopied onto the screen). The printing form should only be used for printing art graphics, but not for printing additional advertising (e.g. exhibition posters). The printed sheets must be signed and numbered, a large edition (number of sheets) should be avoided. Halftone prints should only be used if this is necessary for the artistic implementation of the motif (pure "photo prints" in four-color halftone printing are often classified as "reproductions"). Films produced by photographs or drawn master copies should be destroyed after printing so that unauthorized reprinting is no longer possible. Experiments with the great possibilities of the screen printing process (glazes, opaque colors, relief printing, color change, iris printing etc.) often support the expressiveness of a screen printing graphic.
Screen printing in the electronics industry


The easiest way to describe the manufacture of printed circuits (circuit boards) using the screen printing process is to take a look back at history. This groundbreaking process was developed by the Austrian Paul Eisler . Eisler studied at the Technical University in Vienna . At that time, the components in electrical circuits were connected to one another by wires. Instead, Eisler suggested providing an insulating plate with a thin copper layer on its surface , from which the connections between the components should be etched out. Lanes were printed onto the copper layer using an acid-resistant lacquer using a screen printing process. The exposed copper layer was then etched away so that only the conductor tracks remained and the circuit board could then be equipped with the components. Eisler's invention had the advantage that the production of electrical devices could be simplified and thus rationalized and, at the same time, the devices could be made more compact. Printed circuits were first used in the Allied war industries.
After the war, the process was increasingly used in the production of consumer electronics . With the decline of the European consumer electronics industry and its relocation to East Asian countries since the late 1970s, the production of printed circuit boards in Europe also declined sharply. Today printed circuit boards are produced in large numbers for computers, entertainment electronics, cell phones, etc. The smaller and smaller devices require the screen printing process to reach the limit of what is technically possible. Surface-mounted components ( Surface Mounted Device , "SMD") enable a further reduction in the design of the device: The electronic parts are no longer plugged into pre-drilled holes in the printed circuit board and soldered, but rather placed and fused onto soldering points printed on by screen printing.
Another field of screen printing in the electronics industry is the production of circuit boards in thick-film technology . Here, electrical resistors or conductors are printed directly with electrically conductive printing pastes in a thick layer - sometimes using precious metals . For example, electrical regulators or heatable coatings (e.g. for heating jugs) are manufactured.
Despite the increasing spread of touch-sensitive monitors, keyboard foils are often used as a user interface for electrical devices. Such films are used as input keyboards in vending machines, coffee machines and many other devices. The keyboards consist of a foil that has been screen-printed with the graphic image of the keyboard on its back. Behind this graphically designed user interface there are conductor tracks and electrical contact points - also printed using the screen printing process. At the touch of a finger on the buttons, they cause the respective electrical contacts to close and the desired function of the device to be triggered.
- Macro photos
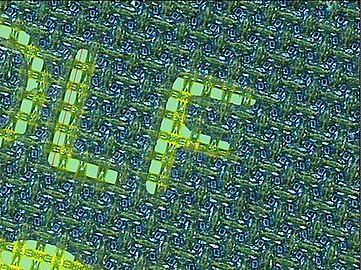
The L is 2mm long

This line is 0.945 mm wide

A N


literature
- Karl Bachler: Serigraphy - History of the artist's screen printing . Verlag Der Siebdruck, Lübeck 1977.
- Claus W. Gerhardt - History of Printing Processes, Part 1: Embossing and Screen Printing, Copyright: Anton Hiersemann, Stuttgart, 1974 ISBN 3-7772 7421-6
- Jacob Biegeleisen: screen printing . Hörnemann, Bonn 1971, 1978, 1986, ISBN 3-87384-446-X .
- Hartmut Büchel: Siebdruck Digest . Dräger Druck, Lübeck 1992, ISBN 3-925402-08-X .
- Jan van Duppen: Manual for screen printing . Dräger Druck, Lübeck 1990, ISBN 3-925402-20-9 .
- Kurt Friedrich Ehlers: screen printing . Callwey, Munich 1980, ISBN 3-7667-0546-6 .
- Brad Faine: DuMont's Handbook of Screen Printing, History-Technique-Practice . DuMont, Cologne 1991, ISBN 3-7701-2653-X .
- Siegfried E. Fuchs: The serigraphy, a technical guide for artists and collectors . Bongers, Recklinghausen 1981, ISBN 3-7647-0337-7 .
- Claus Gerhardt : History of the printing process. Part 1. Embossing and screen printing. Hiersemann 1974, ISBN 3-7772-7421-6 .
- Wolfgang Hainke: screen printing, technology, practice, history . DuMont, Cologne 1979, ISBN 3-7701-1071-4 .
- Henrike Müller: templates . DuMont, Cologne 1994, ISBN 3-7701-3184-3 (the book contains a detailed chapter on the history of stenciling)
- Heinz-Josef Homann: Textbook screen printing printing form production . Homann, Emmendingen 1995, ISBN 3-9805022-0-1 .
- Steve Hoskins: Screen printing with water-soluble inks . Haupt, Bern 2002, ISBN 3-258-06424-5 .
- Guido Lengwiler: The History of Screen Printing . Niggli, Sulgen 2013, ISBN 978-3-7212-0876-4
- André Peyskens: The technical basics of screen production. Millennium Edition. Ed. SAATI, Be.reich Siebdruck. Tecnografica Lomazzo, Como Ital. 1991, 2001 (multilingual).
- Andreas Rombold: screen printing and serigraphy . Urania, Stuttgart 2002, ISBN 3-363-00997-6 .
- Hans Gerd Scheer: screen printing manual . Dräger Druck, Lübeck 1999, ISBN 3-925402-41-1 .
- Sefar : screen printing manual . Sefar, Thal Switzerland 2005, ISBN 3-9523064-1-X .
- Uta Catharina Sienel: Screen printing and its print media - On the materiality of a young printing process. Herbert Utz Verlag, Munich 2008, ISBN 978-3-8316-0824-9 .
- Siebdruckpraxis 1. Siebdruck-Partner, Tamm. Pragma COM, Agency for Communication, Ludwigsburg 2004.
- Siebdruckpraxis 2. Siebdruck-Partner, Tamm. Pragma COM, Agency for Communication, Ludwigsburg 2005.
German language journals:
- The screen printing . Dräger Druck, Lübeck 1955ff. ISSN 0178-2835
- German printer . Deutscher Drucker Verlagsgesellschaft, Ostfildern 1894ff.
- Screen printing Infopost: SIP . Gruber, Rödermark 1985-1997, ZDB -ID 1179057-x
- SIP: trade journal for textile finishing and promotion . Gruber, Rödermark 1999-2003, ISSN 1615-7117
- TVP: trade journal for textile finishing and promotion . Gruber, Eppertshausen 2004 ff., ISSN 1613-2505
International journals:
- Screen Printing Magazine . st-mediagroup, Cincinnati OH, 1953 ff., ISSN 0036-9594 .
- Signs of the Times . Magazines. st-mediagroup, Cincinnati OH, 1906 ff., ISSN 0037-5063 .
Web links
- History of screen printing ( Memento from December 18, 2014 in the Internet Archive ) The website contains a 70-page PDF on the development of graphic screen printing.
- Museum of the history of office machines (the website contains a chapter on the history of stencil transfer printers - direct link to the chapter)
- Federal guild of print and digital media trade, Germany-wide professional association of screen printers and flexographers
Individual evidence
- ↑ farbton-media.de
- ↑ Abrasion ( Wiktionary )
- ↑ Meshzahl ( Memento from July 5, 2010 in the Internet Archive ) AVT of Microelectronics: Dickschicht-Hybridtechnik , p. 66, University of Applied Sciences Munich
- ^ Nicholas Hammond: Modern Wildlife Painting. Pica Press, 1998, ISBN 187-340-355-0 , p. 228